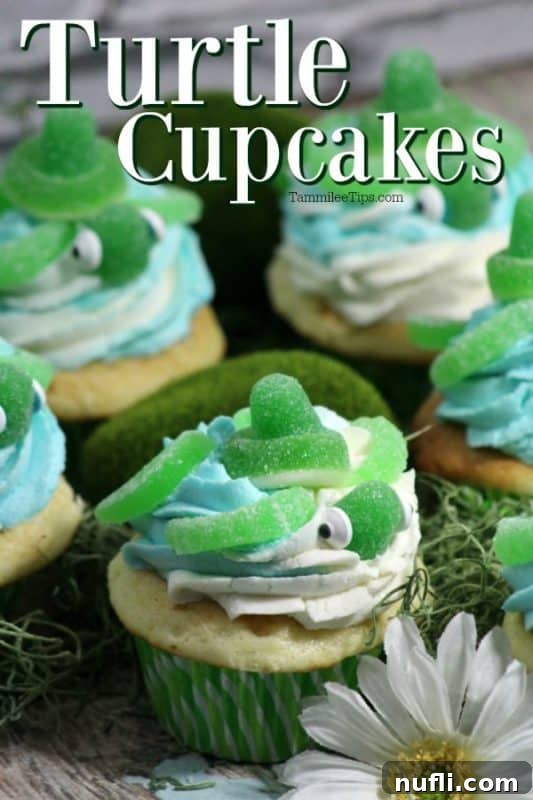
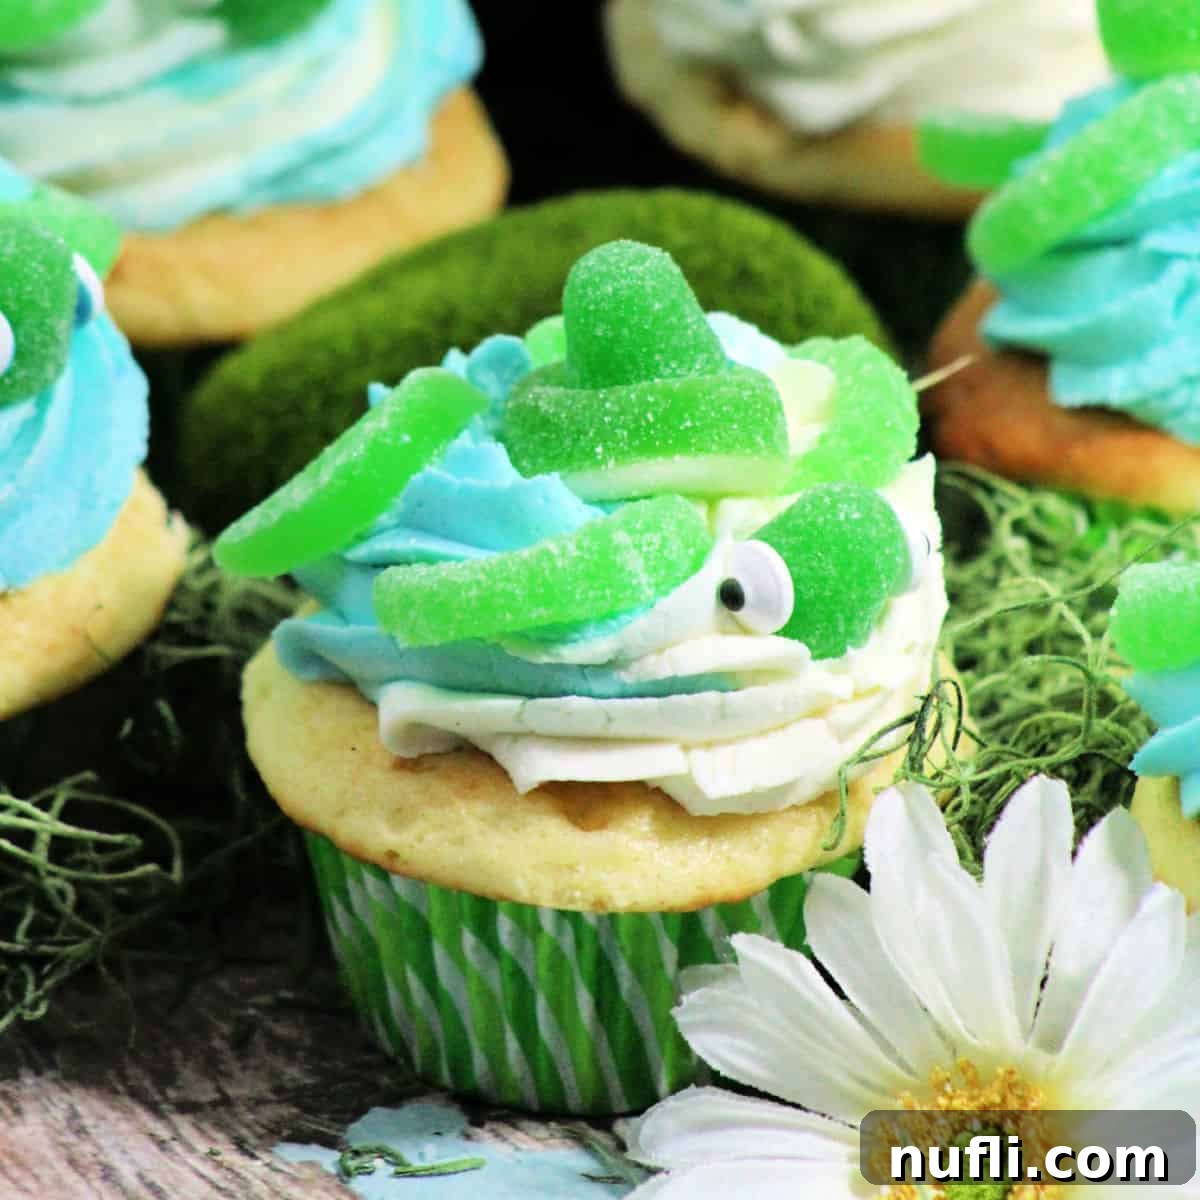
Dive into a whimsical underwater adventure right from your kitchen with these incredibly charming Turtle Cupcakes! Perfect for any ocean-themed celebration, a nature-inspired gathering, or simply a delightful treat, these cupcakes are almost too cute to eat – but we promise, they are worth every delicious bite. Forget store-bought desserts; crafting these adorable sea creatures is a joyous experience that brings a splash of magic to any occasion. This comprehensive guide will walk you through creating moist, fluffy cupcakes, expertly piped frosting resembling ocean waves, and the cutest candy turtles you’ve ever seen, ensuring your dessert table makes a memorable splash!

Crafting the Perfect Turtle Cupcakes for Your Next Celebration
These delightful turtle cupcakes are more than just a dessert; they’re a centerpiece! Imagine them gracing the dessert table at an “Under the Sea” birthday party, a baby shower for an expectant ocean lover, or even as a fun, educational treat for a school event focused on marine life. The vibrant colors and playful design are sure to capture hearts, making them an instant favorite among both children and adults. What makes these cupcakes truly special is the thoughtful combination of flavors and textures, from the tender crumb of the cake to the creamy frosting and the playful candy accents.
There’s an undeniable charm in homemade treats, and these turtle cupcakes are a testament to that. They allow for a level of personalization and care that store-bought options simply can’t match. Plus, the process of creating them is a fantastic activity for bakers of all skill levels, and even a wonderful way to involve younger family members in the kitchen. Get ready to embark on a baking journey that’s as rewarding as it is delicious!
Essential Cupcake Ingredients: The Foundation of Flavor
Every exceptional cupcake begins with quality ingredients. For our luscious turtle cupcakes, we focus on a blend that ensures both moisture and a delightful rise. Here’s what you’ll need, along with a few tips:
- ½ C (113g) Unsalted Butter, at room temperature: Using unsalted butter allows you to control the salt content in your recipe. Room temperature butter is crucial for proper creaming, which incorporates air into the batter, resulting in a lighter cupcake.
- 2 Egg Whites & 2 Whole Eggs: This combination contributes to the cupcake’s structure and tenderness. Ensure all eggs are at room temperature for better emulsification with the butter mixture.
- 2 C (250g) All-Purpose Flour: The backbone of our cupcake, providing structure.
- 1 teaspoon Baking Powder: A leavening agent that helps the cupcakes rise.
- ½ teaspoon Salt: Balances the sweetness and enhances all the flavors.
- ¼ teaspoon Baking Soda: Works with the buttermilk to create a tender crumb.
- ¾ C Buttermilk: Adds moisture and a slight tang, reacting with the baking soda for extra lift and tenderness. If you don’t have buttermilk, you can easily make your own by adding 1 tablespoon of white vinegar or lemon juice to a measuring cup and filling the rest with regular milk, letting it sit for 5-10 minutes.
- 1 ½ C (300g) White Sugar: Provides sweetness and also helps with moisture retention.
- 1 teaspoon Vanilla Extract: Essential for a classic, comforting flavor profile. Choose a good quality extract for the best results.
Baking Bliss: Step-by-Step Cupcake Instructions
Follow these detailed steps to create perfectly baked cupcakes:
- Prepare Your Oven and Muffin Tins: Preheat your oven to a precise 350 degrees Fahrenheit (175°C). While the oven heats, line a 12-cup muffin tin with paper cupcake liners. This ensures your cupcakes won’t stick and makes for easy cleanup.
- Combine Dry Ingredients: In a medium-sized bowl, sift together the flour, baking powder, salt, and baking soda. Sifting helps to remove any lumps and aerates the dry ingredients, leading to a lighter, fluffier cupcake texture. Set aside.
- Cream Butter: In a large mixing bowl, using an electric mixer, beat the room-temperature unsalted butter on high speed for about 30 seconds until it’s light and creamy.
- Incorporate Sugar and Vanilla: Gradually add the white sugar and vanilla extract to the creamed butter. Continue beating on medium-high speed until the mixture is truly light, fluffy, and pale in color. This step is crucial for incorporating air, which contributes to the cupcake’s volume and tender texture.
- Add Eggs Gradually: Add the egg whites, beating until just combined. Then, add the whole eggs one at a time, ensuring each egg is fully incorporated into the mixture before adding the next. Scrape down the sides of the bowl as needed to ensure everything is well mixed. Beating well after each addition helps create a stable emulsion.
- Alternate Wet and Dry Ingredients: With the mixer on low speed, begin to alternate adding the sifted flour mixture and the buttermilk to the butter mixture. Start by adding approximately one-third of the flour mixture, mixing until just combined. Follow with one-third of the buttermilk, mixing until just incorporated. Repeat this process, ending with the final one-third of the flour mixture. It’s important to mix on low speed and only until the ingredients are just combined to avoid overmixing, which can lead to tough cupcakes. Scrape down the bowl one last time to ensure uniformity.
- Fill Liners and Bake: Divide the cupcake batter evenly among the prepared paper liners, filling each about two-thirds full. Bake in the preheated oven for 20-25 minutes, or until a wooden skewer or toothpick inserted into the center of a cupcake comes out clean.
- Cooling Process: Allow the cupcakes to cool in the muffin tin for about 10 minutes. This helps them set and prevents them from sticking.
- Final Cooling: Carefully remove the cupcakes from the muffin tin and transfer them to a wire rack to cool completely. Ensure they are entirely cool before frosting; otherwise, your beautiful frosting will melt.

Ocean Waves: Luscious Buttercream Frosting
Our two-toned frosting will mimic the gentle waves of the ocean, creating a perfect base for our adorable turtles. Achieve that beautiful ocean blue swirl with this easy recipe:
Frosting Ingredients:
- 1 C (226g) Soft Unsalted Butter: Again, room temperature is key for a smooth, creamy frosting.
- 4 + C Powdered Sugar (Confectioners’ Sugar): Provides sweetness and body to the frosting. You might need a little more or less depending on desired consistency.
- 4 Tablespoons Heavy Whipping Cream: Adds richness and helps achieve the perfect creamy texture.
- Blue Gel Food Coloring: Gel coloring provides a concentrated color without adding too much liquid, which could alter the frosting’s consistency.
Frosting Directions:
- Cream Butter and Sugar: In a large mixing bowl, beat the soft unsalted butter until creamy. Gradually add the powdered sugar, one cup at a time, mixing on low speed until combined, then increasing to medium-high speed. Continue beating until the mixture is light, fluffy, and well-creamed.
- Adjust Consistency: If the frosting appears too stiff or isn’t creaming smoothly, add the heavy whipping cream, one tablespoon at a time, beating after each addition until the desired consistency is reached.
- Test for Stiff Peaks: The frosting should be thick enough to hold its shape. To test for stiff peaks, lift the beater from the frosting; the peak should stand upright without falling over. If it’s too soft, add more powdered sugar, ½ cup at a time, beating well after each addition until stiff peaks are achieved. If it’s too thick, add a tiny bit more cream or milk.
- Create Two-Tone Frosting: Divide the frosting into two equal portions. Leave one bowl of frosting white. To the second bowl, add several drops of blue gel food coloring. Start with a few drops and add more gradually until you achieve a beautiful “ocean blue” shade. Stir well to ensure the color is evenly distributed.
- Prepare Pastry Bag: Fit a large frosting tip (such as a large star or round tip) into a pastry bag. Carefully scoop the white frosting into one side of the pastry bag. Then, scoop the blue frosting into the other side of the same pastry bag. Gently twist the open end of the pastry bag to push the frosting towards the tip. You may want to test a small amount on a plate to ensure both colors are coming out simultaneously, creating a lovely swirl.
- Frost Cupcakes: Holding the pastry bag upright, start frosting each cooled cupcake from the outer edge, working in a circular motion towards the center. Create a beautiful swirl that resembles ocean waves.
Adorable Turtle Toppers: Bringing Them to Life
The final touch that transforms a delicious cupcake into an enchanting sea creature!
Turtle Decoration Ingredients:
- Sour Apple Gummy Ring Candies: These will form the base of the turtle’s shell.
- Green Gum Drop Candies: Perfect for the turtle’s body and head.
- Green Gum Candy (similar to orange slices or fruit slices): These will be cut to form the fins.
- Candy Eyes: To give our turtles personality!
- Royal Icing (or a small dot of frosting): For “gluing” the candy eyes.
- Toothpick or Kitchen Skewer: Helpful for positioning.
Turtle Assembly Directions:
- Create the Turtle Shell: For each cupcake, carefully place a sour apple gummy ring on top of the frosted surface. This forms the outer edge of the turtle’s shell. Then, gently place a green gum drop candy in the center of the gummy ring, pressing it slightly into the frosting to secure it.
- Fashion the Fins: Take a green gum candy (like an orange slice candy, but green) and cut it into two pieces. One slightly thinner piece will serve as the front fins, and the thicker piece will be the hind fins. You can shape them slightly with kitchen shears to resemble flippers.
- Form the Head: A small green gum drop will be the turtle’s head. To attach the candy eyes, use a tiny dab of royal icing or a bit of the prepared buttercream frosting on the back of each eye and gently press them onto the sides of the gumdrop head. Allow the icing to set for a minute.
- Assemble the Turtle: Carefully place the prepared head at the front of the gumdrop body. Insert the cut fin pieces around the gumdrop body, gently pushing them into the frosting to hold them in place. Arrange them to look like the turtle is swimming on the cupcake’s surface. Repeat for all cupcakes.
Tips for Success & Creative Variations
- Plan Ahead: You can bake the cupcakes a day in advance and store them in an airtight container at room temperature. The frosting can also be made a day ahead and stored in the refrigerator; just bring it to room temperature and re-whip briefly before use.
- Kid-Friendly Activity: Decorating these cupcakes is a fantastic activity for children! Let them help with placing the gummy rings, gumdrops, and candy eyes. It’s a great way to encourage creativity and fine motor skills.
- Storage: Once decorated, these cupcakes are best stored in an airtight container at room temperature for up to 2-3 days, or in the refrigerator for longer freshness. Allow them to come to room temperature before serving for the best flavor and texture.
- Flavor Variations: Don’t limit yourself to vanilla! Consider a lemon cupcake base for a zesty twist, or even a subtle coconut flavor to enhance the tropical, ocean theme.
- Candy Alternatives: If you can’t find specific candies, get creative! Green fruit leather cut into shapes could work for fins, or even green M&M’s for smaller decorative accents on the shell.
Creating these charming turtle cupcakes is not just about baking; it’s about making memories and bringing a little extra joy to your celebrations. Whether you’re a seasoned baker or just starting, this recipe provides a fun and rewarding experience that culminates in an undeniably delightful dessert. Get ready to impress your guests with these adorable sea creature treats!
A Note on Kitchen Safety: Heat Resistant Potholders
Safety in the kitchen is paramount. A few years ago, we experienced a fire scare when a cloth potholder accidentally caught fire on an unattended burner. Thankfully, we were able to quickly extinguish it. Since then, we’ve exclusively relied on heat-resistant potholders. We highly recommend investing in good quality, silicone or other heat-proof options to keep your kitchen safe while you create delicious treats.
Do you love discovering new recipes? Be sure to explore our extensive collection of copycat recipes, irresistible dessert recipes, and convenient CrockPot Recipes.
Stay connected and never miss a delicious update! Follow Tammilee Tips on Facebook, Instagram, and Pinterest for all our latest recipe posts, baking tips, and culinary inspiration. We love seeing your creations, so don’t forget to share your photos!
