As the air turns crisp and shadows lengthen, Halloween beckons with its promise of spooky fun and delightful treats. Among the myriad of ghoulish goodies, Mummy Rice Krispie Treats stand out as an absolute favorite. These charmingly eerie desserts are not just simple to create; they bring an instant festive flair to any Halloween gathering, school party, or family movie night. Whether you prefer the convenience of store-bought Rice Krispie Treats or the satisfying chewiness of a homemade batch, transforming them into adorable mummies is a quick and rewarding activity that even the busiest of hosts can manage.
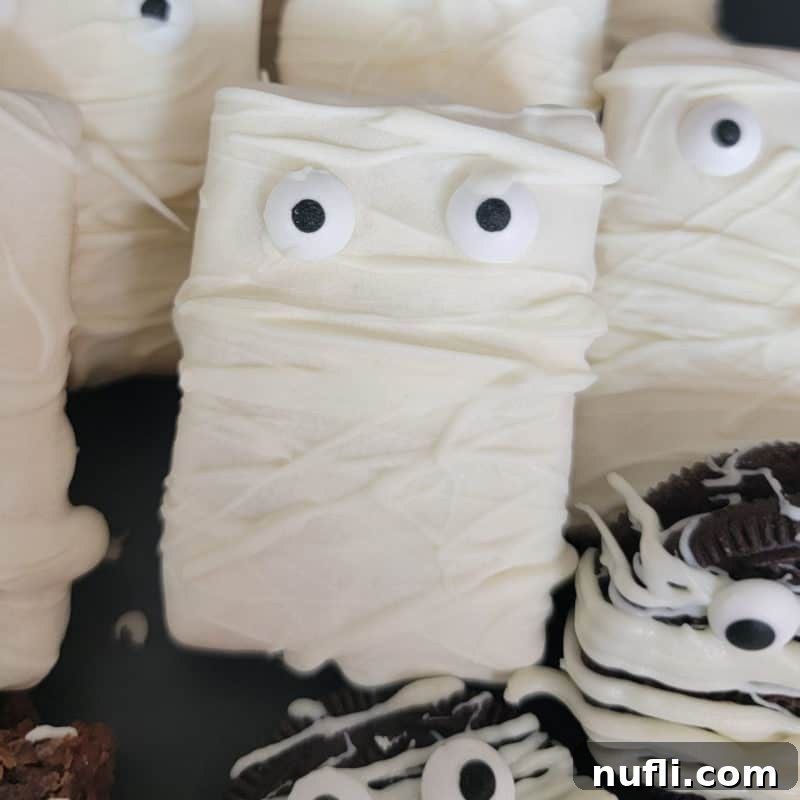
Easy Mummy Rice Krispie Treats: Your Ultimate Guide to Spooky Sweetness
Welcome to a special week dedicated to all things mummified! If you’ve been following along, you know we’ve already embarked on a culinary adventure, wrapping up everything from Mummy Dogs and Mummy Doughnuts to Mummy Twinkies and Mummy Brownies. This delightful series was inspired by a challenge from my fantastic husband: how many things could I creatively “mummify” for Halloween? Armed with a stash of candy eyes and creamy candy melts, I dove headfirst into the challenge, and these Mummy Rice Krispie Treats are among the cutest, easiest, and most crowd-pleasing results.
There’s something uniquely captivating about the spooky season that encourages playful creativity in the kitchen. Turning everyday treats into festive Halloween characters adds a touch of magic that delights both children and adults. Our goal this week is to prove that creating adorable, themed snacks doesn’t have to be complicated or time-consuming. While we’re focusing on sweet delights now, rest assured, I’m also exploring some savory mummy recipes to offer a balanced Halloween feast!
These Mummy Rice Krispie Treats aren’t just a standalone hit; they’re also fantastic components for a larger Halloween dessert board. Imagine them nestled amongst our vibrant Frankenstein Rice Krispie Treats and cheerful Pumpkin Rice Krispie Treats. The combination offers a delightful array of textures, colors, and spooky characters, making your dessert display truly unforgettable.
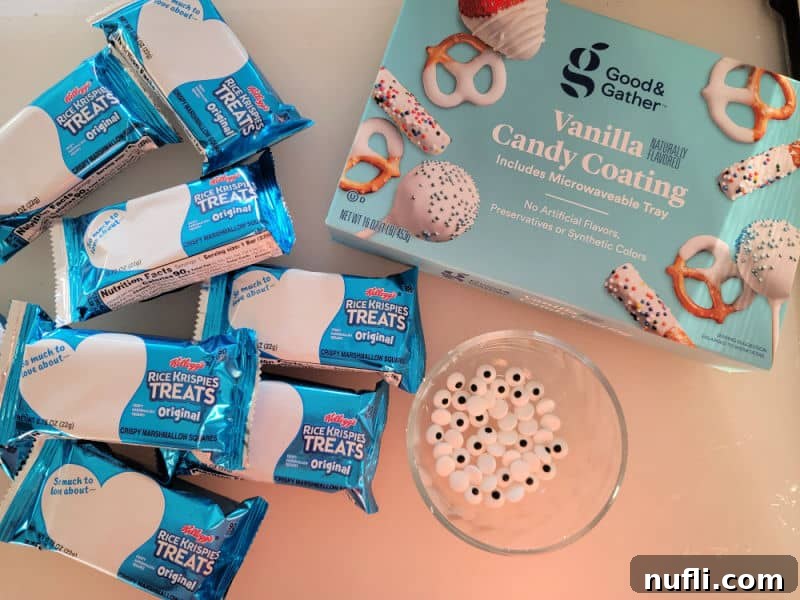
Essential Ingredients for Your Mummy Creations
Crafting these adorable mummy treats requires just a handful of straightforward ingredients. The beauty of this recipe lies in its simplicity, making it accessible for bakers of all skill levels. Here’s a quick overview of what you’ll need, with detailed insights to help you choose the best options:
- Rice Krispie Treats: This is the foundation of our mummy. You have two excellent options here:
- Store-Bought Rice Krispie Treats: For ultimate convenience, especially during the busy holiday season, pre-made treats are a lifesaver. They offer consistent sizing, which ensures all your mummies look uniform and makes the dipping process incredibly easy. This option significantly reduces prep time, allowing you to focus on the fun decorating aspect.
- Homemade Rice Krispie Treats: If you love the fresh, chewy texture of homemade, they are an excellent choice. You’ll need basic pantry staples like Rice Krispies cereal, butter, marshmallows, and a touch of vanilla extract. Homemade treats allow for customization in size and shape, giving you full control over your mummy army. Just ensure they are fully set and cooled before dipping.
- Almond Bark or White Candy Melts: This is what gives our mummies their signature white “bandages.” Almond bark and candy melts are specifically designed for easy melting and setting, providing a smooth, consistent coating without the fuss often associated with tempering traditional white chocolate. They offer a stable, quick-drying finish that makes decorating a breeze.
- Candy Eyes / Candy Googly Eyes: These small, edible eyes bring your mummies to life, adding a touch of humor and personality. Available in various sizes, you can choose tiny ones for a more subtle look or larger eyes for a bolder, cartoonish effect. They are crucial for that quintessential mummy expression!
Why Choose Store-Bought Treats for Halloween?
While homemade Rice Krispie Treats are undeniably delicious, there’s a practical advantage to opting for store-bought versions when making these Halloween mummies. During a bustling holiday week, every minute saved is precious. Pre-packaged treats guarantee uniform size and shape, eliminating the need to meticulously cut and shape your own. This consistency ensures your mummy treats look professional and makes the dipping process smoother, as each treat will fit perfectly into your melted candy coating. It’s a small shortcut that makes a big difference in reducing holiday stress.
Essential Equipment for Your Mummy Making Adventure
Having the right tools can make all the difference in the kitchen, turning a potentially messy task into a seamless, enjoyable experience. For these Mummy Rice Krispie Treats, a few key pieces of equipment will ensure your success:
- Large Mixing Bowl: We highly recommend a spacious, microwave-safe bowl, preferably one with a handle, like a glass batter bowl. A large bowl provides ample space for melting your candy melts without overcrowding and makes dipping the Rice Krispie Treats much easier. The handle offers a secure grip, preventing slips and reducing the likelihood of getting sticky white chocolate all over your hands. Ensure it’s microwave-safe for efficient melting.
- Parchment Paper: An absolute must for quick and easy cleanup! Lining your baking sheets with parchment paper prevents the coated treats from sticking as they set. Once the candy melts harden, the treats lift off effortlessly, leaving your baking sheets pristine. It’s a simple trick that saves a lot of scrubbing.
- Baking Sheets with Sides: Investing in baking sheets with raised edges is a game-changer for any dessert project involving coating or drizzling. The sides act as a barrier, preventing treats from sliding off the edge as you move them or transfer them to the refrigerator. This simple feature helps contain any accidental drips or stray candy melts, keeping your workspace cleaner.
Additional Tools for Homemade Treats
If you opt for homemade Rice Krispie Treats, you’ll also need a few extra items to prepare your base:
- Large Pot: For melting butter and marshmallows.
- Non-Stick Cooking Spray: Essential for coating your pot and spatula to prevent stickiness.
- Wooden Spoon or Spatula: For mixing the cereal into the marshmallow mixture.
- Baking Pan: To press your warm Rice Krispie mixture into.
- Sharp Knife: For cutting the set treats into uniform rectangular pieces.
- Patience: Allow adequate time for your homemade treats to set and cool completely before attempting to coat them.
Crafting Your Mummy Rice Krispie Treats: A Step-by-Step Guide
Creating these spooky-cute mummies is a straightforward process, perfect for a fun afternoon activity with the family. Here’s how you can transform simple Rice Krispie Treats into festive Halloween delights:
- Prepare Your Treats and Workspace: Begin by preparing your Rice Krispie Treats. If you’re using store-bought, simply unwrap them and arrange them on a parchment-lined baking sheet. If you’ve made them from scratch, ensure they are completely cooled and cut into uniform rectangular shapes. Gather your candy eyes and have them ready for easy access. Prepare your workspace by laying out additional parchment paper if needed, ensuring easy transfer of the dipped treats.
- Melt the Candy Coating: Place your almond bark or white candy melts into a large, microwave-safe mixing bowl. Microwave in 30-second intervals, stirring thoroughly after each interval. It’s crucial to stir frequently to ensure even melting and prevent the chocolate from overheating or seizing. Continue until the candy melts are smooth and fully liquid, with no lumps. Alternatively, you can use a double boiler for a more controlled melting process.
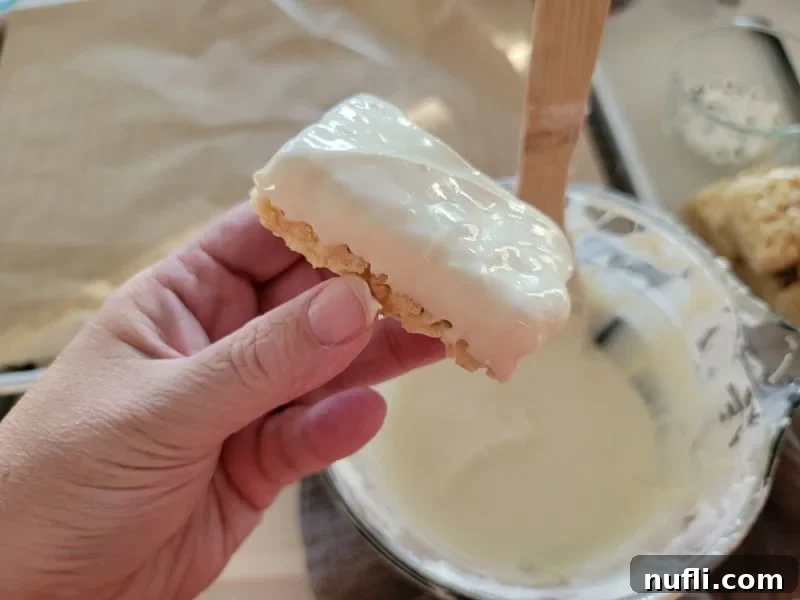
- Dip the Treats with Care: Gently hold a Rice Krispie Treat and carefully dip approximately two-thirds of it into the melted white chocolate. We recommend leaving the very back portion of the treat uncoated, as this makes handling easier and provides a neat, clean edge. Allow any excess chocolate to drip back into the bowl before placing the dipped treat onto your parchment-lined baking sheet. This ensures a clean finish and avoids pooling.
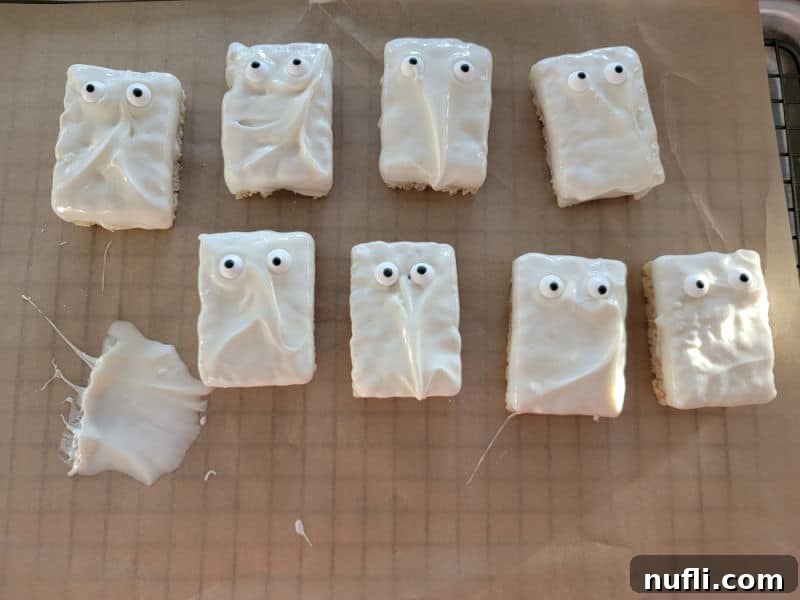
- Attach the Candy Eyeballs: Immediately after dipping each treat, while the chocolate is still wet, gently press two candy eyeballs onto the coated surface. Position them near the top to give your mummy a “head.” The wet chocolate will act as an adhesive, securing the eyes in place. Allow the base coat of chocolate to set slightly before moving to the next step. If the chocolate sets too quickly, you can dab a tiny bit of melted chocolate on the back of the eyes to help them stick.
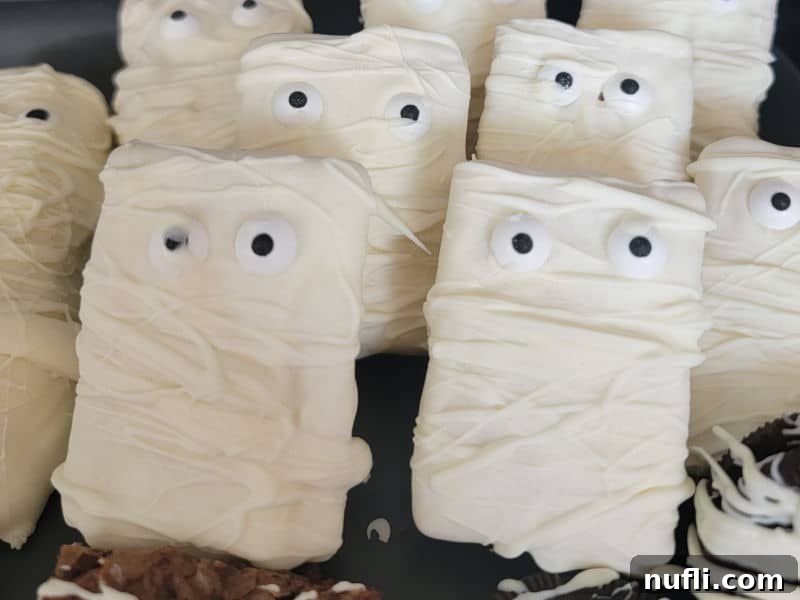
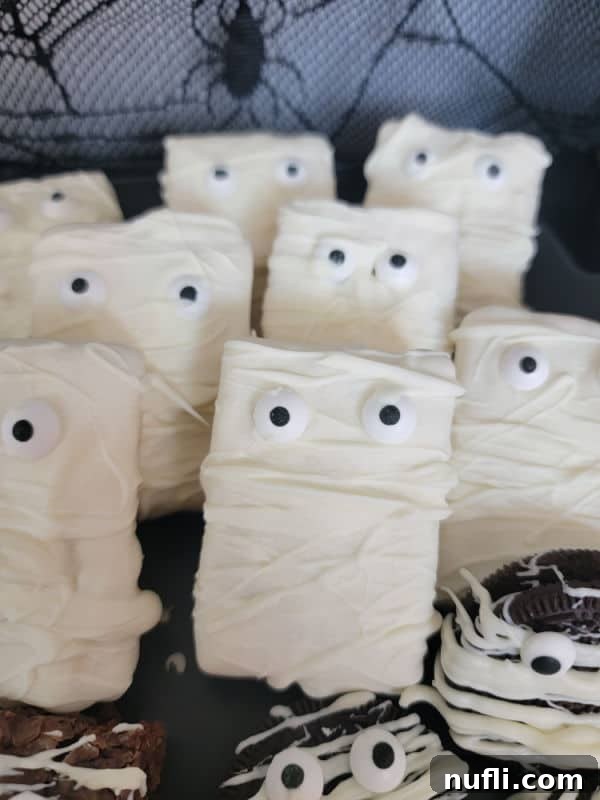
- Create the Mummy Bandages: Once the base coat of chocolate has mostly set (it doesn’t need to be completely hardened, just firm enough that the eyes won’t slide), it’s time to create the iconic mummy bandages. Dip a fork, a small spoon, or even a piping bag with a small tip into the remaining melted white chocolate. Drizzle the chocolate over the dipped portion of the treat in a zigzag pattern, overlapping the candy eyes. Vary the thickness and direction of your drizzles to mimic the look of wrapped bandages. This artistic step truly brings your mummies to life!
Recipe Tips for Perfect Mummy Treats
Achieving perfectly eerie and delicious Mummy Rice Krispie Treats is simple with a few expert tips:
- Mind Your Time: Total preparation and decorating time will vary significantly based on whether you’re making homemade Rice Krispie Treats or using store-bought ones. Store-bought significantly cuts down on prep.
- Consistent Bandages: For uniform mummy wrap bandages, consider using a piping bag with a small, round tip, or even a plastic Ziploc bag with a tiny corner snipped off. This allows for controlled drizzling and ensures all your mummies have a similar, neat appearance.
- Prevent Chocolate Seizing: When melting candy melts, avoid introducing any water, as even a tiny drop can cause the chocolate to seize and become thick and clumpy. Stir frequently during microwaving, or use a double boiler for more control.
- Chill for Speed: If you’re short on time and need the chocolate to set faster, you can place the baking sheets with the dipped treats in the refrigerator for 5-10 minutes. Be careful not to leave them in too long, as extreme temperature changes can sometimes affect the chocolate’s texture.
- Work in Batches: If you’re making a large quantity, work in smaller batches. This keeps your melted candy coating at the ideal consistency and prevents it from setting prematurely while you’re still dipping.
- Nutrition Information: Please note that nutrition information, including calories, carbohydrates, protein, cholesterol, sodium, vitamins, and fiber, will vary based on the specific brands and ingredients you use (e.g., homemade vs. store-bought treats, type of candy melts). It’s always best to calculate nutritional values based on your exact ingredients for the most accurate figures.
Preparation and Storage Guidelines
These Mummy Rice Krispie Treats are not only fun to make but also incredibly convenient to prepare and store, making them ideal for party planning:
- Make Ahead: Yes, these treats are perfect for making ahead! They hold up beautifully for several days, allowing you to get a head start on your Halloween preparations.
- Storage: To maintain their freshness and prevent them from drying out or sticking, store your Mummy Rice Krispie Treats in an airtight container at room temperature. We generally advise against refrigerating them, as the condensation can cause the chocolate coating to “sweat” or become discolored, affecting their appearance and texture.
- Freezing: While you technically can freeze Rice Krispie Treats, be aware that the chocolate coating might undergo a slight change in texture or appearance upon thawing. If you choose to freeze, wrap them individually in plastic wrap before placing them in an airtight freezer-safe container. Thaw at room temperature.
Creative Recipe Variations for Every Taste
These Mummy Rice Krispie Treats are incredibly versatile, offering plenty of opportunities for customization:
- Flavor Substitutions: This recipe works seamlessly with both homemade and store-bought treats. If you’re whipping up a homemade batch, consider experimenting with different cereal flavors (e.g., Cocoa Krispies for a darker mummy, or adding a dash of pumpkin spice to the marshmallow mixture for a fall twist).
- Vegetarian Option: To make these treats suitable for vegetarians, ensure your homemade Rice Krispie Treats are made with vegetarian marshmallows, which are gelatin-free.
- Vegan Option: For a fully vegan version, use vegan Rice Krispie Treats (either homemade with vegan marshmallows and butter alternatives, or select a certified vegan brand) and ensure your candy melts are dairy-free and vegan-friendly.
- Gluten-Free: Many pre-made Rice Krispie Treats contain gluten. However, there are several excellent brands that offer gluten-free rice cereal and certified gluten-free treats, such as Barbara’s, One Degree, Nature’s Path, and Aldi’s gluten-free line. Always check labels carefully.
- Size and Servings: This recipe is endlessly scalable! Whether you need to make just one for a special snack or hundreds for a massive party, simply adjust the quantity of ingredients accordingly. Just ensure you have enough space for all your mummies to set properly before storing them.
- Add Color: While traditional mummies are white, you can add a drop or two of oil-based food coloring (specifically for chocolate) to your candy melts to create brightly colored or pastel “bandages” for a modern, whimsical mummy.
What to Serve Alongside Your Spooky Mummies
These Mummy Rice Krispie Treats are fantastic on their own, but they also shine when paired with other Halloween-themed snacks, main dishes, desserts, and drinks to create a truly immersive experience.
Spooky Snacks:
- Monster Munch: A sweet and savory snack mix packed with Halloween colors and candies.
- Candy Corn and Peanuts: A classic, addictive combination of sweet and salty.
- Pretzel Bones: Simple, savory, and perfectly shaped for a graveyard theme.
- Salted Caramel Popcorn: A decadent treat that balances the sweetness of the mummies.
- Pumpkin Rice Krispie Treats: Adorable pumpkin-shaped treats for extra fall flair.
- Frankenstein Rice Krispie Treats: More character-themed Krispie treats for a diverse dessert spread.
- Bloody Bandages: Creepy and delicious, adding a truly gruesome touch.
- Candy Corn Bark: A colorful and easy-to-make confection.
- Halloween Candy: Of course, no Halloween spread is complete without an assortment of classic Halloween candies.
Main Dishes & Entrees:
Balance the sweetness with some fun, themed main courses before diving into desserts:
- Halloween Pasta: Fun, vibrantly colored pasta dishes that kids will love.
- Mummy Dogs: Hot dogs wrapped in pastry strips to resemble mummies – a savory companion to your sweet mummies.
- Mummy Quesadillas: Cheesy and comforting, with a festive mummy design.
Spooktacular Desserts:
Beyond the Rice Krispie Treats, offer a variety of sweet endings:
- Witch Hat Cookies: Creative and whimsical, these cookies are quick to assemble.
- Reese’s Bats: Combining peanut butter cups with chocolate cookies for an irresistible bat treat.
- Marshmallow Ghosts: Simple, fluffy, and ghostly delights.
- Pretzel Skeleton Bones: White chocolate-dipped pretzels shaped like bones are both salty and sweet.
- Halloween Candy: Always a staple for any Halloween celebration.
Refreshing Drinks:
Don’t forget the beverages to wash down all those treats!
- Hot Chocolate: Perfect for a chilly autumn evening.
- Pumpkin Spice Latte: A seasonal favorite, warm and comforting.
- Kool Aid Slushie: A colorful and fun option for kids.
- Oreo Milkshake: Rich and creamy, a classic crowd-pleaser.
- Freckled Lemonade: Sweet and tangy, with a vibrant red hue.
- Sonic Ocean Water: A bright blue, refreshing beverage for a themed party.
When to Unleash Your Mummy Treats
These Mummy Rice Krispie Treats are versatile and suitable for a variety of occasions, especially throughout the autumn season:
- Halloween Parties: The ultimate setting for these festive treats! They’re easy to serve, visually appealing, and always a hit.
- School Parties: Kid-friendly and simple to transport, they make perfect contributions to classroom celebrations.
- Fall Events: Whether it’s a pumpkin patch visit, a hayride, or a harvest festival, these treats fit right in.
- Family Dinner: A fun and unexpected dessert to brighten up any weeknight meal.
- Movie Night: Pair them with a spooky movie marathon for an extra touch of thematic fun.
- Halloween Wedding: For couples seeking a playful and memorable dessert, these mummies add character to a dessert bar.
- Kids’ Treat / After-School Snack: A delightful surprise that’s much more exciting than a plain snack.
More Spooky & Sweet Halloween Recipes to Explore
If you’re still hungry for more Halloween creativity, don’t miss these other fantastic ideas:
- Graham Cracker Owls: Adorable, edible owls made with simple ingredients.
- Creepy Egg Eyes: A savory and surprisingly realistic appetizer.
- Candy Corn Cocktail: A vibrant, layered drink for adult Halloween parties.
- Crock Pot Pumpkin Liqueur: A warm and inviting seasonal beverage.
- Bloody Colada Recipe: A spooky twist on a tropical favorite.
- Pumpkin Spice Rice Krispies Treats: A fall-flavored version of the classic.
For an extensive collection of Halloween ideas, be sure to check out all of our Halloween Recipes!
Beyond Halloween: Discover More Delicious Recipes
Love finding delicious new recipes? Explore our wide array of culinary creations:
- Copycat Recipes: Recreate your restaurant favorites at home.
- Dessert Recipes: Indulge your sweet tooth with a variety of delectable treats.
- CrockPot Recipes: Effortless and delicious meals for busy days.
Stay connected for the latest recipe posts and culinary inspiration! Follow Tammilee Tips on Facebook, Instagram, Pinterest, and Twitter.
Mummy Rice Krispie Treats
Easy Mummy Rice Krispie Treats, perfect for Halloween parties or a fun sweet treat.
Prep Time: 20 minutes
Total Time: 20 minutes
Servings: 12
Calories: 274 kcal
Author: Tammilee Tips
Ingredients
- 12 Rice Krispie Treats (store-bought or homemade)
- 24 Candy Eyes
- 1 package Vanilla Almond Bark or white candy melts
Instructions
- Prepare Rice Krispie Treats or unwrap store-bought treats and prep other supplies.
- Melt candy melts in the microwave in 30-second intervals, making sure to stir the white chocolate after every interval until smooth.
- Carefully dip the Rice Krispie treats in the melted chocolate/almond bark, covering about ⅔ of the treat. Leave the back of the treats uncoated for easier handling.
- Attach candy eyeballs to the treats while the chocolate is still wet and allow the base coat of chocolate to set slightly.
- Use a zigzag pattern to spread/drizzle the remaining white chocolate in ribbons over the dipped treats to create the mummy bandages, overlapping the candy eyes.
Kitchen Tools
- Large Mixing Bowl (microwave-safe)
- Baking Sheets
- Parchment Paper
- (Optional: Piping bag or fork for drizzling)
Nutrition Facts
(Approximate values per serving)
- Calories: 274 kcal
- Fat: 14g (22% Daily Value*)
- Saturated Fat: 14g (88%)
- Polyunsaturated Fat: 0.01g
- Monounsaturated Fat: 0.01g
- Sodium: 19mg (1%)
- Potassium: 1mg (0%)
- Carbohydrates: 35g (12%)
- Fiber: 0.004g (0%)
- Sugar: 34g (38%)
- Protein: 0.1g (0%)
- Vitamin A: 67IU (1%)
- Vitamin C: 1mg (1%)
- Calcium: 0.05mg (0%)
- Iron: 0.3mg (2%)
* Percent Daily Values are based on a 2000 calorie diet.
Love this recipe? Follow @TammileeTIps on Pinterest!
Tried this recipe? Mention @TammileeTipsLife when you share a photo!
