Oh my gosh, these are truly the most irresistibly cute Olaf Cookies you’ll ever bake! As a huge fan of the enchanting movie Frozen, I’ve lost count of how many times I’ve watched it and can proudly sing along to almost every song. Yes, even at 39 years old, I know the words by heart, and I wouldn’t have it any other way. The magic of Arendelle, the heartwarming story, and of course, the charmingly goofy snowman, Olaf, hold a special place in my heart.
So, following Olaf’s iconic invitation, I have to ask… Do you want to build a snowman? Or perhaps, more practically and delightfully, would you prefer to create these super cute Olaf cookies? While I appreciate the sentiment of building a snowman, I’m personally quite content to stay warm inside, escaping the cold, and instead, channeling that winter magic into baking up a batch of delicious, beautifully decorated cookies. It sounds like a much more fun and cozy adventure, don’t you agree?

Irresistibly Cute Olaf Cookies: A Magical Recipe for Frozen Fans
These Olaf cookies aren’t just a dessert; they’re a delightful experience waiting to happen. Imagine the joy on faces, especially those of little Frozen enthusiasts, when they see these beloved characters brought to life in edible form. Whether you’re hosting a Frozen-themed birthday party, looking for a fun holiday baking project, or simply want to add a touch of Disney magic to your day, this recipe for decorated sugar cookies topped with flawless royal icing is exactly what you need.
Our comprehensive guide will walk you through every step, from crafting the perfect sugar cookie dough to mixing vibrant royal icing and meticulously decorating each Olaf and snowflake. We’ve simplified the process to ensure success, even for beginner decorators, so get ready to unleash your inner pastry artist and create some memorable, delicious works of art!
The Ultimate Olaf Sugar Cookie Recipe
Creating adorable decorated cookies starts with a fantastic base recipe. Our sugar cookie dough is designed to be sturdy enough for cutting intricate shapes while still baking up soft and delicious. Coupled with our easy-to-manage royal icing, you’ll have all the components for perfect Frozen-themed treats.
Cookie Ingredients:
- 5 C all-purpose flour
- 2 teaspoon baking powder
- 1 teaspoon salt
- 1 ½ C soft unsalted butter
- 2 C granulated sugar
- 4 eggs
- 1 teaspoon vanilla extract (optional, but highly recommended for flavor)
Royal Icing Ingredients:
- 2 egg whites (or 3 tablespoons meringue powder + 5 tablespoons warm water for a safer, stable option)
- 1 C powdered sugar (confectioners’ sugar)
- ½ teaspoon cream of tartar
- Black, orange, & blue gel food coloring
Essential Cookie Cutters:
- Olaf Cookie Cutter
- Large Snowflake Cookie Cutter
Cookie Directions:
- In a large mixing bowl, cream the softened unsalted butter with the granulated sugar until the mixture is light, fluffy, and smooth, ensuring no grainy texture remains. This step is crucial for incorporating air and creating a tender cookie.
- Add all 4 eggs to the creamed mixture at once. Continue mixing until they are fully incorporated.
- Stir in the vanilla extract, if using, and mix until just combined.
- In a separate bowl, sift together the all-purpose flour, baking powder, and salt. Sifting helps to aerate the flour and remove any lumps, ensuring an even texture in your cookies.
- Gradually add the dry mixture to the wet mixture, mixing on low speed until all ingredients are thoroughly blended and a cohesive dough forms. Be careful not to overmix, as this can lead to tough cookies.
- Gather the dough into a ball, then flatten it slightly into a disc. Wrap the dough ball completely in cling wrap, ensuring it’s airtight.
- Refrigerate the dough for at least 6 hours, or preferably overnight. Chilling is essential for firming up the butter, which prevents the cookies from spreading excessively during baking and makes the dough much easier to handle.
- When ready to bake, preheat your oven to 325 degrees Fahrenheit (160 degrees Celsius).
- Remove the chilled cookie dough from the refrigerator and let it sit at room temperature for about 10-15 minutes to soften slightly, making it easier to roll out.
- Lightly flour a clean work surface (like a wooden cutting board) and your rolling pin. Work some flour into the dough as needed to prevent sticking, but avoid adding too much, which can dry out the cookies.
- Roll the dough out evenly to about ¼ inch thickness. Using your Olaf and snowflake cookie cutters, begin cutting out the shapes.
- Line your cookie sheets with parchment paper. This prevents sticking and ensures even baking.
- Carefully transfer the cut cookie shapes to the parchment-lined cookie sheet using a metal spatula.
- Bake in the preheated oven for 8 minutes. Baking times can vary, so keep an eye on them. The cookies are done when the edges are lightly golden.
- Once baked, remove the cookies from the oven and immediately transfer them to a wire rack to cool completely. This takes approximately 10-15 minutes. Cooling thoroughly is vital before decorating to prevent the icing from melting or running.
Crafting Vibrant Royal Icing for Decoration
Royal icing is the secret to beautifully decorated sugar cookies. It dries hard and smooth, providing a perfect canvas for intricate designs. Our recipe yields a stable and vibrant icing, ideal for creating Olaf’s expressive face and delicate snowflakes.
Royal Icing Directions:
- In a clean mixing bowl, combine the egg whites (or prepared meringue powder mixture), powdered sugar, and cream of tartar. Beat on medium speed for 4 minutes until the icing becomes stiff and forms soft peaks. This is your stiff consistency icing, perfect for outlining.
- If your icing is not stiff enough to hold its shape, add an additional ¼ cup of powdered sugar, one tablespoon at a time, mixing well after each addition until the desired consistency is reached.
- Prepare your colored icings:
- Take out 2 tablespoons of the white icing and dye it orange in a small bowl. Stir well to achieve a uniform color.
- In a second bowl, add 4 tablespoons of white icing and several drops of blue gel food coloring. Stir thoroughly to mix well.
- In a third bowl, add 4 tablespoons of white icing and several drops of black gel food coloring. Stir until the color is deep and consistent.
- Keep the remaining majority of the icing in a fourth bowl; this will remain white.
- Spoon each color of icing into individual frosting bags fitted with a #5 tip (or a small round tip). Twist the open end of each bag to push the icing down to the tip, removing any air bubbles.
For flooding the cookies with a thinner consistency of royal icing (known as flood icing), you’ll need to prepare a separate batch from your stiff icing. This is achieved by adding a small amount of water:
- Squeeze the majority of your white icing into a bowl. Add about 1 teaspoon of water to this bowl and mix gently until the icing has a consistency that flows smoothly but isn’t too runny (it should take about 10-15 seconds for a ribbon of icing to disappear back into the bowl when drizzled).
- Repeat this process for any other colors you plan to flood with, such as blue for Olaf’s mouth or snowflakes.
- Leave a small amount of the original, stiffer icing in its frosting bag for outlining later.
Icing Decoration: Bringing Olaf and Snowflakes to Life
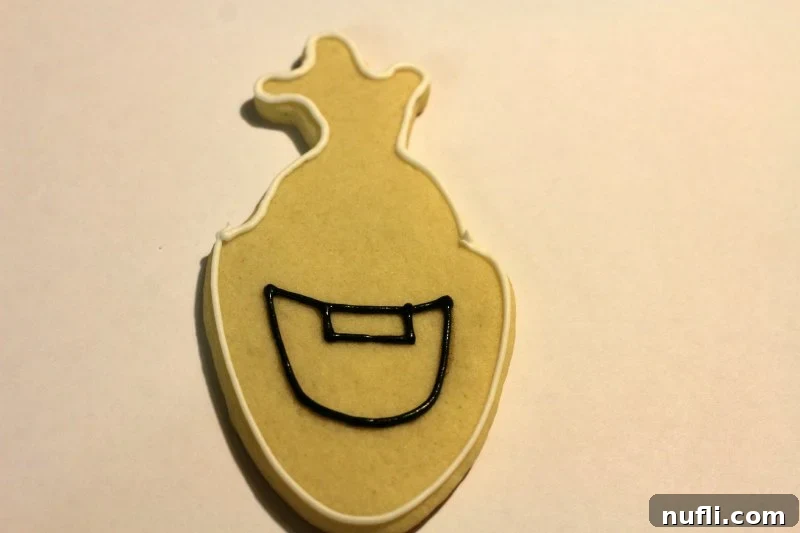



Decorating Olaf Cookies:
- **Outline and Flood (White Base):** Using the stiffer white icing, carefully outline the entire edge of each Olaf cookie. Allow this outline to dry for about 30 seconds to create a barrier. Then, using the thinner white icing (flood icing), fill in the outlined area. Gently spread the icing with a small toothpick or scribe tool to cover the entire surface. Allow this flooded base to dry completely for at least 30 minutes, or until it is firm to the touch.
- **Draw Features with a Food Writer:** Once the white base is completely dry, use a Wilton Foodwriter (black or brown) to gently draw Olaf’s features. Refer to an Olaf picture for accuracy. Sketch his hair (branches), eyebrows, eyes, pupils, nose guide, mouth, and teeth outlines. This gives you a clear guide for piping.
- **Define with Black Icing:** Following your food writer drawings, use the black royal icing to carefully darken the outlines of Olaf’s hair, eyebrows, eyes, and the outline of his mouth. Let these black lines dry for approximately 30 seconds to prevent smudging.
- **Add the Orange Nose:** After the black outlines for the eyes and pupils are dry, switch to the orange icing. Outline Olaf’s carrot nose, then fill it in completely. Allow the orange nose to dry for 30 seconds.
- **Create White Teeth:** Fill in the small square outlined in black for Olaf’s teeth with the stiffer white icing. Let this dry for 30 seconds.
- **Blue Mouth Details:** Using the blue icing, carefully outline the inside of Olaf’s mouth area. Then, use a small amount of the thinner blue icing to fill in the mouth. This creates a subtle depth.
- **Final Drying:** For a professional finish, allow these completed Olaf cookies to dry undisturbed for a minimum of 5-10 hours, or even overnight. This ensures the royal icing hardens completely, preventing smudges and making them stackable.
Decorating Snowflake Cookies:
- **Outline and Flood (White Base):** Just like the Olaf cookies, use the stiffer white icing to outline each snowflake cookie. Let it dry for about 30 seconds. Then, fill in the outlined area with the thinner white icing. Ensure an even coat and allow this base layer to dry for at least 30 minutes.
- **Draw Details with a Food Writer:** Once the white base is dry, use your Wilton Foodwriter to sketch intricate snowflake patterns and details onto the cookie. You can follow reference pictures for complex designs or freehand simple elegant patterns.
- **Highlight with Blue Icing:** Following your drawn patterns, use the blue royal icing to highlight and trace these markings. Start by piping the main lines of the snowflake from top to bottom, then side to side. Allow 30 seconds for these lines to partially dry before moving on.
- **Accent Points:** Next, add small accent points or dots at each end of the blue lines, enhancing the snowflake’s detail. Let these dry for another 30 seconds.
- **Center Dots:** Finally, pipe five small dots in the very center of the snowflake with blue icing, completing the design.
- **Complete Drying:** Allow the snowflake cookies to dry completely for 5-10 hours, or overnight, to ensure the icing is fully set.
Tips for Cookie Decorating Success
- **Patience is Key:** Decorating royal icing cookies is an art form that requires patience. Don’t rush the drying process between layers; it’s crucial for crisp lines and vibrant colors.
- **Icing Consistency:** Mastering royal icing consistency is paramount. A stiff consistency is best for outlines, while a thinner, “flood” consistency is used to fill in areas. If your icing is too thick for flooding, add water a tiny drop at a time. If it’s too thin, add more powdered sugar.
- **Clean Workspace:** Work in a clean, dry, and cool environment. Humidity can affect how royal icing dries.
- **Quality Tools:** Invest in good quality piping bags, tips, and food coloring. Gel food colors are recommended as they provide vibrant hues without thinning the icing.
- **Practice Makes Perfect:** If you’re new to cookie decorating, don’t be discouraged if your first few aren’t perfect. Practice on parchment paper first to get a feel for piping.
- **Storage:** Once completely dry, store decorated cookies in an airtight container at room temperature for up to two weeks. Avoid refrigerating, as condensation can damage the icing.
Serving and Presentation Ideas
These adorable Olaf and snowflake cookies are perfect for a variety of occasions. Arrange them on a festive platter for a holiday gathering, package them individually as party favors, or simply enjoy them with a glass of milk after a long day. They also make fantastic edible gifts for friends and family, especially those who adore Frozen. Their bright colors and recognizable characters are sure to bring smiles wherever they go!
Frequently Asked Questions About Olaf Cookies
- Can I use store-bought cookie dough?
- While you technically can, store-bought dough often spreads more during baking, making it difficult to maintain intricate shapes like Olaf or snowflakes. Our homemade recipe is specifically designed for decorated cut-out cookies to hold their shape perfectly.
- What if I don’t have an Olaf cookie cutter?
- You can often find templates online to print and cut out. Simply place the paper template on your rolled-out dough and use a sharp knife to trace around it. It requires a bit more care but works well!
- How do I prevent my royal icing from cracking?
- Cracking can occur if the icing is too thin or if the cookies are moved before the icing is completely dry. Ensure your flood icing has the right consistency and allow ample drying time.
- Can I make these cookies ahead of time?
- Absolutely! The cookie dough can be made and refrigerated for up to 3-4 days, or frozen for up to 3 months. Once decorated and fully dry, the cookies can be stored in an airtight container at room temperature for up to two weeks, making them perfect for advance preparation.

Seriously Cute Olaf Cookies!
25 minutes
8 minutes
6 hours
6 hours 33 minutes
12
Tammilee Tips
Ingredients
Cookie Ingredients
- 5 C All Purpose Flour
- 2 Teaspoon Baking Powder
- 1 Teaspoon Salt
- 1 ½ C Unsalted Butter soft
- 2 C White Sugar
- 4 Eggs
- 1 Teaspoon Vanilla Extract
Royal Icing Ingredients:
- 2 Egg Whites (or 3 tablespoons meringue powder + 5 tablespoons warm water)
- 1 C Confectioners Powdered Sugar
- ½ Teaspoon Cream of Tartar
- Black, orange, & blue gel food coloring
Instructions
Olaf Cookies Baking
- Cream the soft butter with the sugar until the combination is smooth, not grainy to the touch in a mixing bowl.
- Add all 4 eggs at one time. Continue to mix.
- Add the vanilla extract. Continue mixing.
- Sift the flour, baking powder, and salt together in a separate bowl.
- Gradually add the dry mixture to the wet mixture.
- Continue mixing until all ingredients are thoroughly blended to form a cohesive dough.
- Form the dough into a ball, wrap it completely in cling wrap.
- Refrigerate for about 6 hours or overnight until the dough is firm.
- Preheat oven to 325 degrees Fahrenheit (160°C).
- Pull the cookie dough out of the refrigerator and let it sit out to soften up a bit (10-15 mins).
- Lightly flour a cutting board and rolling pin. Roll out the dough evenly to ¼ inch thickness.
- Use cookie cutters to make your Olaf and snowflake shapes.
- Line cookie sheets with parchment paper.
- Using a metal spatula, carefully move the cut cookies to the parchment-lined cookie sheet.
- Bake at 325 degrees F for 8 minutes. Check if the cookies are thoroughly baked (edges lightly golden).
- Take the cookies off the cookie sheet and place on a wire rack to cool completely (about 10-15 minutes).
Royal Icing Preparation:
- Combine all royal icing ingredients in a mixing bowl, mixing on medium speed for 4 minutes until stiff (except your food coloring).
- If icing is not stiff enough, add ¼ C powdered sugar, one tablespoon at a time.
- Take out 2 tablespoons of icing to dye orange in a small bowl.
- In a second bowl, add 4 tablespoons of icing and several drops of blue gel food coloring. Stir to mix well.
- In a third bowl, add 4 tablespoons of icing and several drops of black gel food coloring. Stir to mix well.
- Put the remaining plain icing in a fourth bowl. This bowl of icing remains white.
- Spoon each color of icing into individual frosting bags with a #5 tip. Twist the open end of the bag to push the icing to the tip.
- For flood icing (thinner consistency), squeeze the majority of the desired color icing into a bowl, then add 1 teaspoon of water to this and mix it in until it flows smoothly. Keep a small amount of stiff icing in the bag for outlining.
Olaf Cookie Decorating Steps:
- Outline each Olaf cookie in white (stiff icing). Allow to dry for about 30 seconds. Fill in the cookies with the white thinner icing (flood icing). Allow to dry for about 30 minutes until firm.
- Using a Wilton Foodwriter, draw Olaf’s hair (branches), eyebrows, eyes, pupils, nose guide, mouth & teeth outlines.
- Using black icing (stiff), darken the outlines drawn with the foodwriter. Allow these lines to dry for about 30 seconds.
- After the black outlines for the eyes and pupils are dry, use the orange icing (stiff) to outline the nose, then fill it in. Allow 30 seconds for the nose to dry.
- Fill in the square outlined in black for the teeth with white icing (stiff). Allow to dry for 30 seconds.
- Using the blue icing (stiff), outline the inside of the mouth, then use the thinner blue icing to fill in the mouth.
- Allow these completed Olaf cookies to dry for 5-10 hours to fully set.
Snowflake Cookies Decorating Steps:
- Outline each snowflake cookie in white (stiff icing). Allow to dry for about 30 seconds. Fill in the cookies with the white thinner icing (flood icing). Allow to dry for about 30 minutes until firm.
- Using a Wilton Foodwriter, draw intricate snowflake details on the dry white base.
- Following the drawings, use the blue icing (stiff) to pipe over those markings.
- Start by covering the main lines of the snowflake from top to bottom, then side to side, allowing 30 seconds for the lines to partially dry.
- Next, add accent points at each end of the lines in blue icing. Allow 30 seconds for this to dry.
- Lastly, add five small dots in the center of the snowflake with blue icing.
- Allow the snowflake cookies 5-10 hours to dry completely.
Kitchen Tools
- Cookie Sheets
- Parchment Paper
- Hand Mixer
- Rolling Pin
- Mixing Bowls
- Piping Bags & Tips (#5 round recommended)
- Metal Spatula
- Wire Rack
Connect with Us for More Delicious Recipes!
Do you enjoy discovering new and exciting recipes? Be sure to check out our other popular categories, including a treasure trove of copycat recipes, delectable dessert recipes, and comforting CrockPot Recipes. There’s always something new to inspire your next meal or baking project!
Stay connected and never miss a recipe! Follow Tammilee Tips on your favorite social media platforms: Facebook, Instagram, and Pinterest. We love seeing your culinary creations and sharing our latest kitchen adventures with you!
