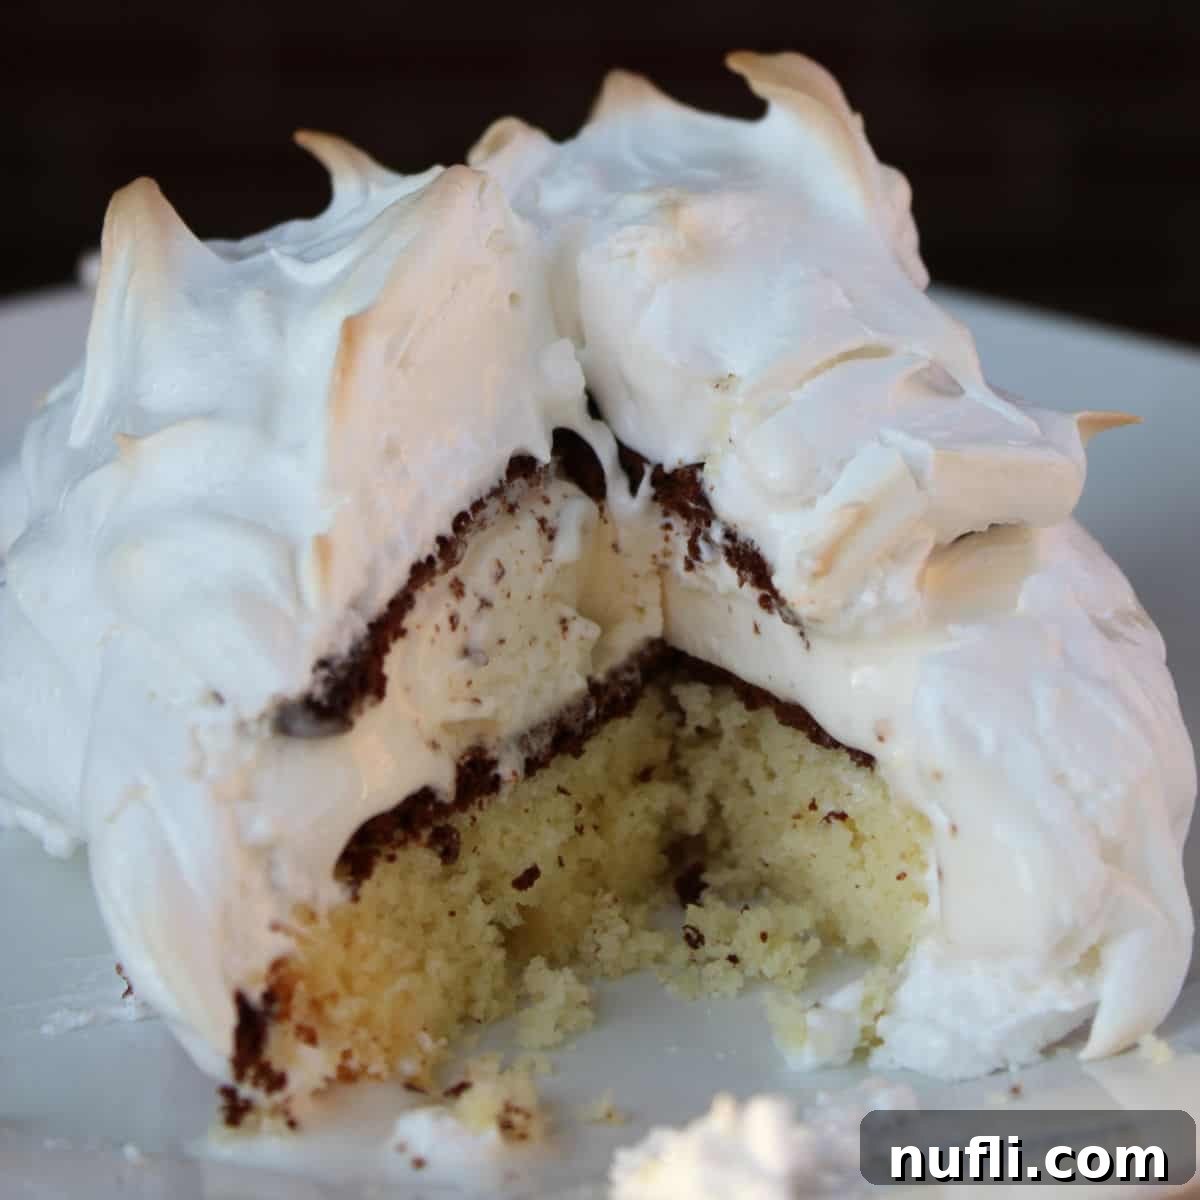
Effortless Mini Baked Alaska: Your Guide to a Show-Stopping Dessert
Prepare to be amazed by these incredible Mini Baked Alaska treats! They’re not only exceptionally delicious but also surprisingly simple to create, thanks to some clever shortcuts we’ve incorporated into this recipe. Forget complicated steps and lengthy preparations – this streamlined approach brings the magic of Baked Alaska right to your kitchen, transforming an intimidating classic into an accessible and delightful homemade dessert perfect for any occasion. With layers of moist pound cake, creamy ice cream, and a perfectly toasted meringue, these mini delights are guaranteed to impress your family and friends without all the fuss.
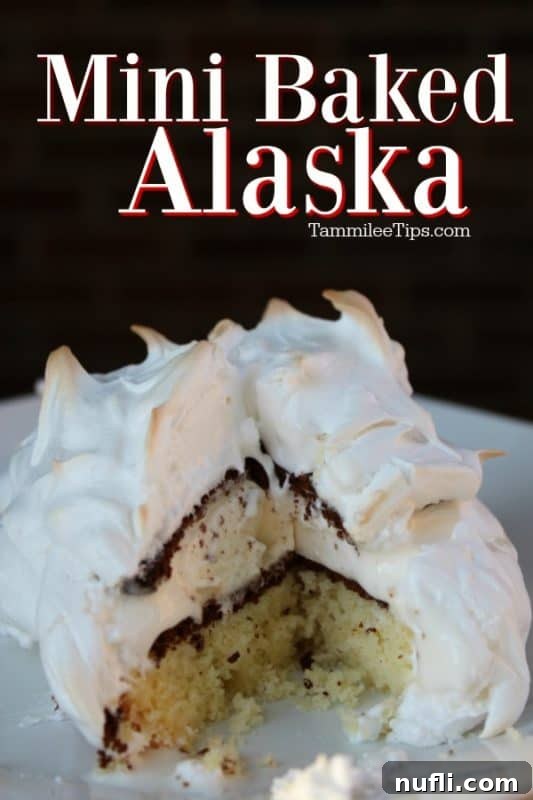
Mini Baked Alaska Recipe: Recreate Cruise Ship Magic at Home
One of the most memorable aspects of any cruise ship vacation for me has always been the extraordinary dining experiences. There’s a constant thrill of discovering new flavors and culinary delights with every meal. On one particular cruise, dinner was progressing as usual when suddenly, the lights in the dining room dimmed, and an unexpected series of bangs echoed through the ship. For a moment, a ripple of concern went through the room – such noises are certainly not what you hope for during a relaxing cruise vacation!
However, the mystery was quickly and deliciously resolved. Almost immediately, the ship’s staff appeared, bursting into the room with platters piled high with desserts. They were cheering, singing, and radiating an infectious sense of fun and festivity. We exchanged puzzled glances, wondering what grand spectacle could possibly warrant such joyous commotion. Then, the answer became clear: they were celebrating the arrival of Baked Alaskas!
From that moment on, the Baked Alaska ritual became a highlight of our cruise vacations. It wasn’t just the sheer pageantry and celebratory atmosphere that accompanied their presentation; it was also the undeniably exquisite and comforting flavor of the dessert itself. The combination of cold, creamy ice cream, moist cake, and toasted meringue was simply irresistible. Inspired by these unforgettable moments, I was determined to bring that special cruise dessert experience home. That’s how this recipe for easy Mini Baked Alaska was born – a way to capture the deliciousness and fun without needing a galley full of chefs or a transatlantic journey.
Why Choose Mini Baked Alaska?
While a full-sized Baked Alaska is certainly impressive, making individual mini versions offers numerous advantages, especially for home cooks and entertainers. Firstly, portion control becomes effortless; each guest receives their own perfectly sized dessert. This also makes serving incredibly easy, eliminating the need to slice a large, potentially messy, meringue-covered cake. Moreover, the smaller size allows for quicker baking time and faster preparation, making this classic dessert much more approachable for busy schedules. Plus, who doesn’t love having their very own personal dessert masterpiece that looks like it came straight from a gourmet bakery?
The Secret to Our Quick & Easy Baked Alaska
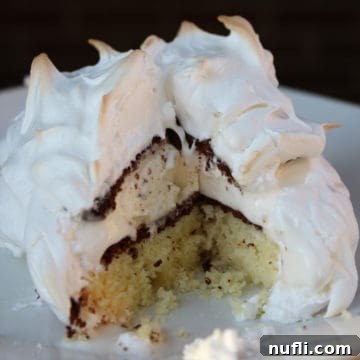
The traditional Baked Alaska can seem daunting, with its multiple components and precise timing. Our recipe simplifies this process significantly by incorporating a few brilliant shortcuts that don’t compromise on flavor or visual appeal. Instead of baking a cake from scratch, we use ready-made pound cake. For the ice cream layer, we skip scooping and freezing by utilizing convenient Klondike Ice Cream Bars. These pre-portioned bars not only save time but also create a perfectly structured ice cream layer that holds its shape beautifully under the meringue. This means you get all the delicious layers of a classic Baked Alaska with a fraction of the effort, making it ideal for impromptu dessert cravings or last-minute entertaining. It’s truly a game-changer for bringing this elegant dessert to your dinner table with minimal stress.
Ingredients for Your Homemade Mini Baked Alaska
Gathering your ingredients is the first step towards creating these delightful desserts. Our simplified list ensures you spend less time shopping and more time enjoying!
- Egg Whites: The foundation of our fluffy, cloud-like meringue, providing essential insulation for the ice cream and developing a beautiful, golden-brown crust when baked.
- Cream of Tartar: A crucial ingredient that acts as a stabilizer for the egg whites. It helps them whip up to impressive stiff peaks and maintain their structure perfectly throughout the baking process, preventing collapse.
- Salt: Just a tiny pinch makes a significant difference, enhancing the overall flavor of the meringue and perfectly balancing its sweetness, preventing it from being cloyingly sweet.
- Granulated Sugar: This fine sugar sweetens the meringue, giving it that characteristic delicate crispness and contributing to its appealing golden-brown finish as it toasts in the oven.
- Vanilla Extract: Adds a warm, inviting, and aromatic note to the meringue. Its classic flavor profile complements the other components beautifully, creating a more complex and satisfying taste.
- Pound Cake: The sturdy and delicious base for our Mini Baked Alaska. Using high-quality, store-bought pound cake is our ultimate secret weapon for both speed and unparalleled convenience. Opt for a dense, flavorful variety for the best texture.
- Klondike Ice Cream Bars: These pre-made ice cream bars are the epitome of convenience and an absolute game-changer for this recipe! They provide a perfectly portioned, creamy ice cream layer without any fuss, mess, or the need for extensive freezing time. Feel free to experiment with different Klondike flavors for a fun and personalized twist!
Essential Kitchen Tools for Success
Having the right tools on hand can make the baking process even smoother and more enjoyable. Here are a few recommendations to ensure your Mini Baked Alaska turns out perfectly and safely:
- Baking Sheet with Sides: I highly recommend using baking sheets that feature a raised edge. This simple design element can prevent any accidental mishaps, such as your carefully assembled desserts sliding off the sheet and onto the oven floor – a chaotic and disheartening scenario I’ve unfortunately experienced firsthand!
- Parchment Paper: A true kitchen hero for virtually any baking task! Lining your baking sheet with parchment paper makes for incredibly easy cleanup, as it creates a non-stick surface. More importantly for this recipe, it prevents your delicate meringue from adhering to the pan, ensuring a smooth, effortless transfer to your serving plates and a flawless, professional-looking presentation.
- Heat-Resistant Potholders or Oven Mitts: Safety is paramount in the kitchen! A few years ago, we experienced a frightening fire scare when we inadvertently left a burner on, causing a cloth potholder to ignite. Since that alarming incident, we’ve exclusively relied on high-quality, heat-resistant silicone potholders. They offer superior protection for your hands and provide invaluable peace of mind when retrieving hot baking sheets from a high-temperature oven.
Step-by-Step Directions for Perfect Mini Baked Alaska
Follow these simple, clear instructions to create your own beautiful and delicious Mini Baked Alaska, impressing everyone with your newfound baking prowess:
- Preheat Oven to 400°F (200°C): Begin by preheating your oven to a blazing 400 degrees Fahrenheit (approximately 200 degrees Celsius). This precise high heat is absolutely crucial for quickly toasting and caramelizing the meringue to a golden perfection without allowing the delicate ice cream beneath to melt excessively.
- Prepare Baking Sheet & Chill Plates: Line a large baking sheet with a sheet of parchment paper (or foil, if parchment isn’t available, though parchment is highly recommended for its non-stick properties). This preparation will prevent any sticking and ensure an easy, clean transfer of your finished desserts. Simultaneously, place 6 individual dessert plates into your refrigerator or freezer to chill. Serving your Mini Baked Alaska on a cold plate is a small but effective trick to help keep the dessert frozen and firm for longer, enhancing the overall enjoyment.
- Prepare Meringue Base (Soft Peaks): In a meticulously clean and completely dry mixing bowl, combine the egg whites, cream of tartar, and a small pinch of salt. Using an electric mixer (either hand-held or stand mixer), begin beating the mixture on medium-high speed. Continue to beat until soft peaks gracefully begin to form. These peaks will hold their shape when the beaters are lifted, but will still be slightly relaxed and floppy at the tips, indicating the perfect initial consistency.
- Whip Meringue to Stiff Peaks & Flavor: Gradually, and with careful attention, add the granulated sugar into the egg white mixture, one tablespoon at a time, while continuously beating the egg whites. Once all the sugar is incorporated, increase the mixer speed to high and continue to beat until stiff, glossy peaks gloriously form. This means that when you lift the beaters, the meringue will stand up firmly and hold its precise shape without drooping. Finally, gently fold in the vanilla extract until it is just combined. The vanilla adds a lovely fragrance and subtle, complementary flavor to the meringue.
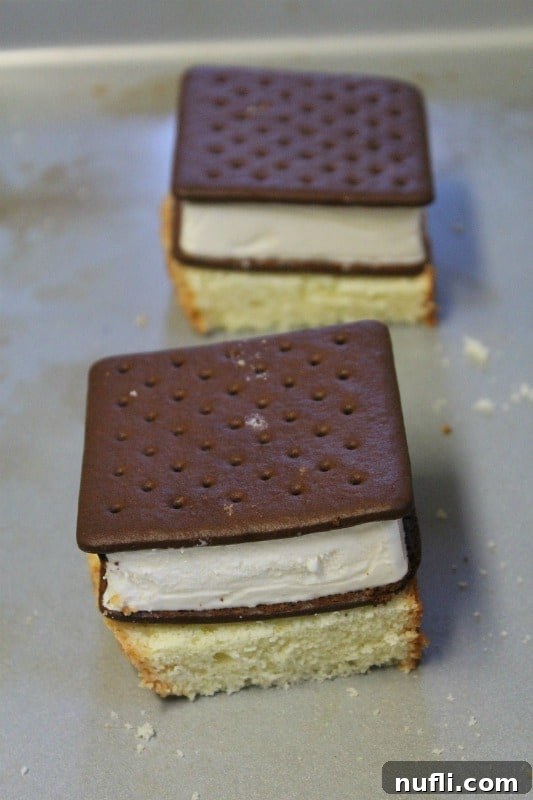
- Trim Pound Cake Bases: Take your pound cake loaf and, using a sharp knife, carefully trim it into slices that are roughly the same size and shape as your Klondike Ice Cream Bars. Aim for uniform slices, approximately ½ inch thick. This ensures a balanced ratio of moist cake to creamy ice cream in every delicious bite of your mini dessert.
- Assemble on Baking Sheet: Neatly arrange the trimmed pound cake pieces onto your prepared baking sheet, ensuring there’s a little space between each one to allow for even baking. Immediately, and with a sense of urgency, top each piece of pound cake with a frozen Klondike Ice Cream Bar. Working quickly at this stage is important to prevent the ice cream from melting too much before it’s covered.
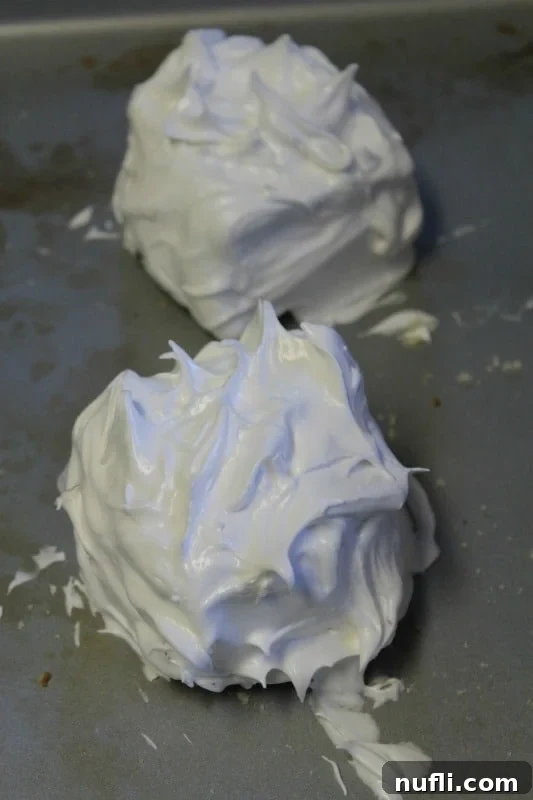
- Cover with Meringue: Using a spatula, spoon, or even a piping bag for more intricate designs, generously spread the prepared meringue over each pound cake and ice cream sandwich. It is absolutely essential to ensure that the meringue completely encases and seals the ice cream bar, extending all the way down to the pound cake and fully covering all sides. This thick, insulating meringue layer is your primary defense, acting as a protective barrier to shield the ice cream from the intense heat of the oven. For a more professional and visually appealing finish, you can create decorative peaks and elegant swirls with the back of your spoon or a piping bag fitted with a star tip.
- Quick Bake to Golden Perfection: Carefully transfer the baking sheet with your assembled Mini Baked Alaskas to your preheated 400°F (200°C) oven. Bake for a very brief period, typically about 4 minutes, or until the meringue achieves a beautiful, golden-brown hue and appears lightly toasted on its peaks. It’s crucial to keep a close watch during this stage, as oven temperatures can vary, and meringue can brown surprisingly quickly. The precise goal here is to toast the meringue rapidly without providing enough time for the heat to penetrate and melt the ice cream underneath, maintaining that delightful contrast.
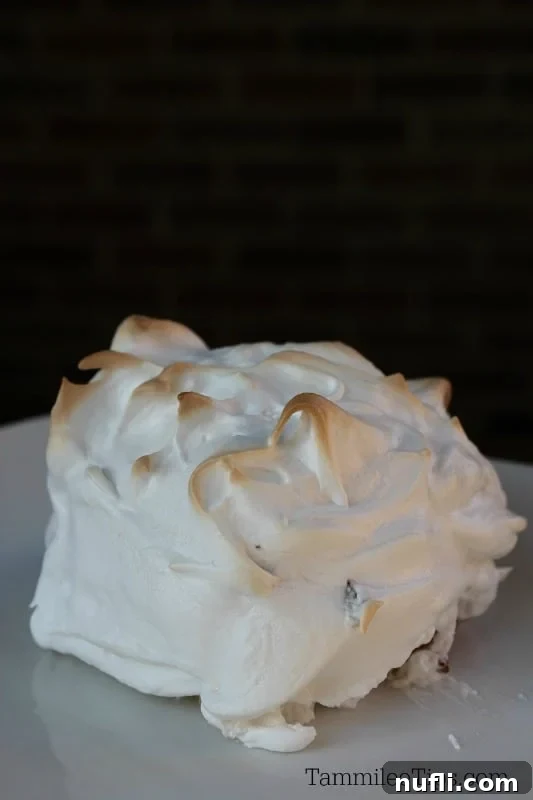
- Serve Immediately: As soon as the Mini Baked Alaskas emerge from the oven, glowing with their golden meringue tops, carefully transfer them to your chilled dessert plates. Do not delay! Serve them immediately to ensure your guests experience the delightful and dramatic contrast of warm, perfectly toasted meringue giving way to a core of cold, creamy ice cream. This dessert is unequivocally at its best when enjoyed fresh from the oven, offering an unforgettable textural and temperature sensation.
Tips for Achieving the Perfect Mini Baked Alaska
Follow these expert tips to ensure your Mini Baked Alaska turns out perfectly every single time, making you a dessert hero:
- Cold Ice Cream is Key: The colder your Klondike bars are, the better! Ensure they are solidly frozen before you begin assembling. You can even pop them back into the freezer for 10-15 minutes after you’ve placed them on the pound cake, just before you apply the meringue. This extra chill factor provides a greater buffer against the oven’s heat.
- Don’t Skimp on Meringue: Think of the meringue as a thick, protective blanket for your ice cream. It’s absolutely vital that the ice cream is completely encased in meringue, with no gaps or exposed areas. Any uncovered ice cream will melt quickly in the hot oven, compromising the dessert’s integrity.
- Hot Oven, Short Bake: This isn’t a slow roast! The high oven temperature (400°F/200°C) combined with a very short baking time (around 4 minutes) is the magic formula. This allows the meringue to quickly caramelize and brown to a beautiful golden hue, while the interior ice cream remains delightfully frozen.
- Use Room Temperature Egg Whites: While the ice cream needs to be frigid, your egg whites for the meringue should be at room temperature. Cold egg whites are easier to separate from the yolks, but room temperature whites whip up much faster and achieve greater volume and stability. Separate them when cold, then let them sit out on the counter for 20-30 minutes before whipping.
- Immaculate Bowl and Utensils: Any trace of grease, fat, or even a tiny speck of egg yolk in your mixing bowl or on your beaters will sabotage your meringue, preventing the egg whites from whipping properly. Ensure all your equipment is sparkling clean and thoroughly dry before you start.
- Chill Your Serving Plates: This small detail makes a big difference! Placing your serving plates in the refrigerator or freezer before plating the hot Baked Alaska will help maintain the dessert’s temperature and slow down the melting process, allowing your guests to savor every bite.
Delicious Variations to Try for Your Mini Baked Alaska
Don’t be afraid to get creative and personalize your Mini Baked Alaska! Here are some exciting ideas to customize this incredible dessert and make it uniquely yours:
- Flavorful Pound Cake Bases: While classic pound cake is wonderful, consider experimenting with different flavored pound cakes. Lemon pound cake offers a zesty contrast, chocolate pound cake creates a decadent base, or even a marble pound cake for visual appeal and blended flavors.
- Ice Cream Extravaganza: While Klondike bars offer unparalleled convenience, you can certainly use scoops of your favorite hard ice cream. Just be sure to scoop the ice cream onto the cake slices and then refreeze the entire assembly until the ice cream is solidly frozen again before applying the meringue. Imagine flavors like refreshing mint chip, sweet strawberry, rich coffee, or even a playful cookies and cream ice cream!
- Decadent Chocolate Drizzle: After your Mini Baked Alaskas emerge from the oven, a quick drizzle of melted dark chocolate, milk chocolate, or a luscious caramel sauce can add an extra layer of decadence and visual appeal.
- Fresh Fruit Coulis: For a bright and fresh counterpoint to the rich dessert, serve your Mini Baked Alaska alongside a vibrant raspberry, strawberry, or mixed berry coulis. The tartness of the fruit beautifully cuts through the sweetness of the meringue and ice cream.
- Crunchy Nutty Topping: Before baking, sprinkle some finely chopped toasted nuts, such as pecans, almonds, or walnuts, over the meringue for added texture and a delightful nutty flavor that complements the sweet notes.
Storage and Make-Ahead Tips for Convenience
Mini Baked Alaskas are undeniably at their peak of perfection when enjoyed immediately after baking. However, you can certainly prepare some components in advance to streamline your process and make serving easier, especially if you’re entertaining:
- Meringue Preparation: For the best volume, stability, and texture, the meringue should ideally be prepared just before you plan to assemble and bake the desserts. It tends to lose its peak structure and airiness if left to sit for too long.
- Pound Cake & Ice Cream Base: This is where you can truly get ahead! Cut your pound cake slices and immediately place them on your parchment-lined baking sheet. Top each slice with a Klondike bar. At this point, you can place this entire assembly into the freezer for several hours or even overnight until it is very firm. This crucial step provides you with extra time and flexibility when you’re ready for the final meringue application and baking.
- Leftovers (if any!): While it’s rare to have any of these delicious treats remaining, if you do find yourself with leftovers, they can be stored in an airtight container in the freezer for a short period (1-2 days). Be aware, however, that the meringue might soften slightly upon thawing, losing some of its crispness. It will still be delicious, just with a slightly different texture.
Frequently Asked Questions About This Classic Dessert
- What exactly is Baked Alaska?
- Baked Alaska is a truly impressive classic dessert that masterfully combines layers of frozen ice cream and moist sponge cake, all beautifully enveloped in a fluffy, insulating meringue. The dessert is then briefly exposed to high heat, either in an oven or with a kitchen torch, to quickly caramelize and toast the meringue to a golden perfection.
- How does the ice cream remain frozen when it’s put into a hot oven?
- This is the magical paradox of Baked Alaska! The key lies in the meringue. The thick layer of whipped egg whites (meringue) acts as an excellent thermal insulator, creating a protective barrier around the cold ice cream. Additionally, the dessert is baked at a very high temperature for only a very short duration. This allows the exterior meringue to brown rapidly without providing enough time for the heat to significantly penetrate and melt the ice cream core.
- Can I substitute the type of cake used?
- Absolutely! While pound cake is highly recommended due to its dense texture and ability to hold its shape well, you can certainly experiment with other types of firm sponge cake, Genoise, or even pre-made brownies for a different and exciting flavor profile. The important thing is to ensure your chosen cake base is sturdy enough and cut to a similar size as your ice cream portion.
- What should I do if my meringue doesn’t form stiff peaks?
- Meringue can be a bit finicky! The most common culprits for meringue failure are the presence of any trace of fat (even a tiny speck of egg yolk or oil) in your mixing bowl or on your beaters, or using egg whites that are too cold. To ensure success, always start with impeccably clean and completely dry equipment, and make sure your egg whites are at room temperature (they whip up much more easily and achieve greater volume when warm).
- Is it possible to prepare Mini Baked Alaska ahead of time?
- You can certainly do some prep work in advance! The best strategy is to assemble the pound cake and ice cream base (cake with Klondike bar on top) and then freeze this assembly until it is rock-solid. However, the meringue itself should ideally be made and applied directly before you plan to bake and serve. Freshly made meringue provides the best volume, texture, and visual appeal, offering that perfect contrast of warm meringue and frozen ice cream.
Discover More Delightful Dessert Recipes
If you’ve thoroughly enjoyed creating and indulging in these magnificent Mini Baked Alaskas, then you’re in for a treat! We invite you to explore more of our fantastic and diverse dessert creations, perfect for satisfying every sweet craving:
- Mini Black Forest Cakes
- Banana Pudding Cake
- Pineapple Angel Food Cake
- Strawberry Shortcake
- Cherry Pie Cake
- Mini Fresh Strawberry Pies
Looking for even more culinary inspiration beyond desserts? Dive into our extensive and popular collection of copycat recipes, where we recreate beloved restaurant dishes at home. Don’t forget to check out our additional categories, including a wealth of other delectable dessert recipes, and our wonderfully convenient CrockPot Recipes, perfect for easy weeknight meals.
Stay connected and ensure you never miss a single delicious recipe or valuable kitchen tip! Be sure to follow Tammilee Tips on MSN, Facebook, Instagram, and Pinterest for all our latest culinary adventures and updates. Happy baking!
Mini Baked Alaska Recipe
How to make delicious easy Mini Baked Alaska
No ratings yet
Print Recipe
20 minutes minutes
4 minutes minutes
24 minutes minutes
6
433kcal
Tammilee Tips
Ingredients
- 1 cup Egg Whites
- 4 Teaspoon Egg Whites
- ½ Teaspoon Cream of Tartar
- ⅛ Teaspoon Salt
- ¾ cup White Sugar
- 1 Teaspoon Vanilla Extract
- 1 Pound cake cut into ½ inch thick slices
- 6 Klondike Ice Cream Bars
Instructions
- Preheat oven to 400 degrees
- Line a baking sheet with foil, chill 6 dessert plates
- To make the meringue topping combine egg whites, cream of tartar, and salt and beat until soft peaks form.
- Gradually add in sugar until stiff peaks form, add the vanilla and mix well
- Trim pound cake pieces to the same size as the ice cream bars
- Place pound cake on baking sheet, top each piece with a Klondike Bar
- Spread meringue over each sandwich sealing completely, make decorative peaks at the top
- Bake in pre-heated oven for about 4 minutes until lightly browned
- Transfer to chilled dessert plates and serve immediately
Kitchen Tools
- Cookie Sheets
- Parchment Paper
Nutrition
Calories from Fat 72
Love this recipe?
Follow @TammileeTIps on Pinterest
Tried this recipe?
Mention @TammileeTipsLife when you share a photo!
Recipe originally shared on July 18, 2013. Updated December 2020.
Recipe adapts from Sandra Lee Money Saving Meals Cookbook
