Easy & Spooky Bloody Band-Aid Cookies: The Ultimate Halloween Party Treat
Halloween is a time for ghoulish delights, spooky decorations, and, of course, outrageously fun treats! If you’re looking to elevate your Halloween party food game with something both incredibly simple to make and delightfully unsettling to look at, then these Easy Halloween Bloody Band-Aid Cookies are your perfect recipe. Forget complicated concoctions; with just three main ingredients, you can conjure up a batch of these epic, eerie cookies that will have your guests both cringing and craving more.
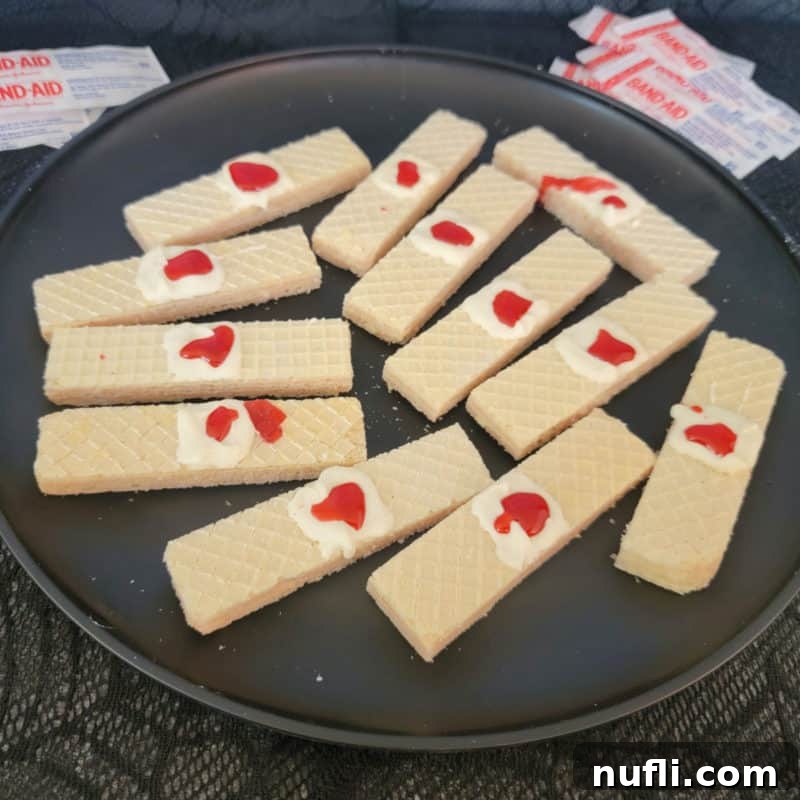
Why These “Bloody Bandage” Cookies Are a Halloween Must-Have
Every Halloween host knows the struggle: you want to create a memorable spread, but time is often limited. That’s where these bloody bandage cookies shine! They are the epitome of “maximum impact, minimal effort.” Imagine the gasps and giggles as your guests spot a platter full of what appears to be used bandages – only to discover they are sweet, vanilla-flavored wafer cookies topped with creamy white chocolate and a “bloody” fruit filling. It’s the perfect balance of gross-out fun and delicious indulgence that defines the Halloween spirit.
This recipe breaks away from the usual mummy-themed treats, offering a fresh, albeit unsettling, take on spooky desserts. While the idea of plating “bloody” food might initially sound a little off-putting, rest assured, these are made from delightful sugar wafer cookies and smooth white chocolate, ensuring a delicious outcome every time. The visual shock value is part of their charm, making them a fantastic conversation starter and a memorable addition to any Halloween gathering.
The Unsettling Charm of Spooky Halloween Treats
There’s a unique joy in embracing the macabre during Halloween, and “bloody” treats fit right into this tradition. From vampire drinks to zombie brains, gross-out food is a classic way to celebrate the season. It’s a chance to be creative, a little bit mischievous, and to get a reaction from your audience. While I confess to getting a little queasy myself when photographing these realistic-looking treats, the humor and shock value they provide are simply priceless. Asking my husband if he wanted a “bloody Band-Aid” with dinner resulted in a look I wish I had captured on camera – a testament to how effectively these simple cookies deliver a spooky surprise!
Kids especially adore the gross factor of Halloween foods. When else during the year can you serve something so playfully grotesque without raising an eyebrow? Halloween is the perfect excuse to go all out with simple, yet effective, treats that elicit a delightful “EWWWWW!” from your guests. These bloody, slightly “dirty” (in appearance only, of course!) band-aid cookies are not just a dessert; they’re an experience, designed to complement your Halloween party platter with their unique and creepy charm.
We wish you a fantastic Halloween filled with ghosts, goblins, vampires, and endless fun. We can’t wait to hear about all the incredible Halloween food creations you bring to life!
Gather Your Ghastly Goods: Simple Ingredients for Bloody Band-Aid Cookies
One of the best things about this recipe is its incredible simplicity. You only need a few readily available ingredients to transform ordinary cookies into extraordinary Halloween delights. Below is a quick overview of the simple components you’ll need. Specific measurements and step-by-step instructions are provided in the printable recipe card at the bottom of this article.
- Sugar Wafer Cookies: These crispy, layered cookies are the perfect base for our “bandages.” Their rectangular shape and light color make them an ideal canvas. While vanilla is commonly used for a classic “band-aid” look, feel free to experiment with chocolate or strawberry wafers for a different twist. If sugar wafers aren’t available, graham crackers can be a suitable alternative, offering a similar flat, rectangular shape.
- White Chocolate Candy Melts/White Icing/White Frosting: This forms the central “gauze pad” of the band-aid. Candy melts are excellent because they harden quickly and provide a smooth, opaque finish. Alternatively, you can use white almond bark, regular white chocolate chips (though they might require a bit of shortening for a smoother consistency), or even pre-made white icing or frosting for ultimate convenience. The key is to have a white medium that can be spread and will set.
- Strawberry Jam or Edible Blood: This is where the “bloody” effect comes into play! Strawberry jam works wonderfully due to its thick texture, bright red color, and fruity taste that complements the cookies. Its consistency helps prevent it from running off the cookie too quickly. For a more realistic, albeit less tasty, effect, you can opt for store-bought edible fake blood. Red food coloring can also be used, but be mindful that it might be thinner and could bleed into the white chocolate or wafer if not applied carefully. You can also find red icing in tubes for easy application.
Essential Equipment for Your Spooky Snack Creation
Preparing these creepy cookies is not only easy on the ingredient front but also requires minimal kitchen tools. Here’s what you’ll need to ensure a smooth and mess-free creation process:
- Baking Sheets: While you won’t be baking the cookies, baking sheets are invaluable for organizing your workspace. They provide a flat surface to arrange your wafer cookies for easy decoration and transport. Opt for baking sheets with raised sides to prevent any cookies or stray “blood” from sliding off your counter.
- Parchment Paper: This is your best friend for easy cleanup. Lining your baking sheet with parchment paper ensures that none of the melted chocolate or sticky “blood” adheres to the pan. It also makes transferring the finished cookies a breeze and prevents red food coloring from staining your countertops.
- Microwave-Safe Bowl: Essential for melting your white chocolate candy melts safely and efficiently.
- Butter Knife or Small Spatula: This tool is perfect for spreading the melted white chocolate into a neat rectangular “gauze pad” in the center of each sugar wafer cookie. Its flat edge allows for precision.
- Toothpick: A simple toothpick is surprisingly versatile for creating intricate “bloody” designs. It allows you to precisely move the edible blood or jam, creating drips, smears, or small pools for a truly authentic, gruesome look.
Step-by-Step Guide: Crafting Your Creepy Cookie Bandages
Creating these Bloody Band-Aid Cookies is a fun and straightforward process. Follow these simple steps to bring your spooky vision to life. Complete instructions are also in the recipe card below.
Step 1: Prepare Your Workspace for a Ghoulish Craft Session
Begin by gathering all your ingredients and equipment. This ensures a seamless and enjoyable decorating experience. The first crucial step is to line a baking sheet with parchment paper. This vital preparation prevents the white chocolate from sticking and, more importantly, catches any drips or excess red “blood” that might escape your cookie canvases. The last thing you want is stubborn red food coloring stains on your kitchen counters or trays, making cleanup a fright!
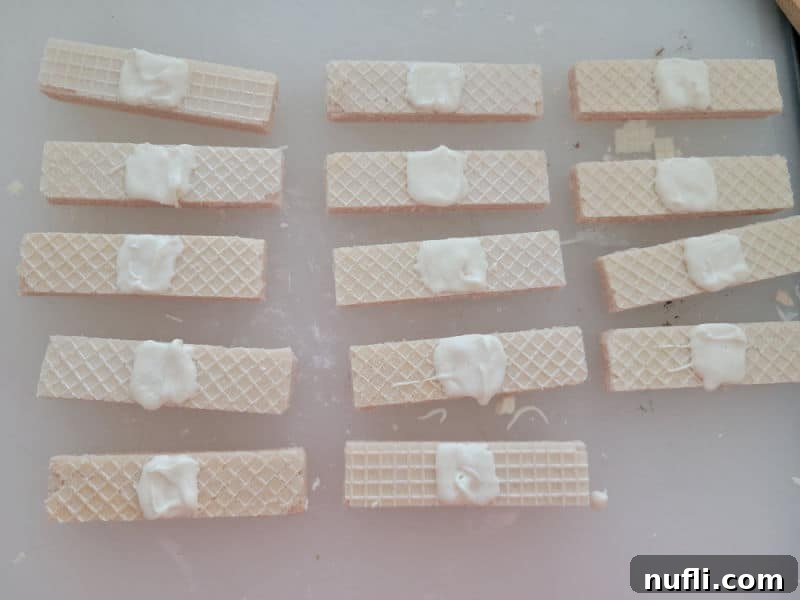
Step 2: Create the “Gauze Pad” with Melted White Chocolate
Next, it’s time to prepare the white “gauze pad” for your band-aids. Place your white chocolate candy melts (or chosen white coating) into a microwave-safe bowl. Heat them in the microwave in short bursts – typically 30-second intervals – stirring thoroughly after each one. Continue this process until the chocolate is completely smooth and free of lumps. Be careful not to overheat, as this can cause the chocolate to seize.
Once melted, use a butter knife or a small spatula to carefully spread a neat rectangular square of the melted chocolate onto the center of each sugar wafer cookie. Aim for a patch that resembles the absorbent pad of a real band-aid. Once all cookies are coated, allow the white chocolate to set and harden completely. You can speed up this process by placing the baking sheet in the refrigerator for about 5-10 minutes.
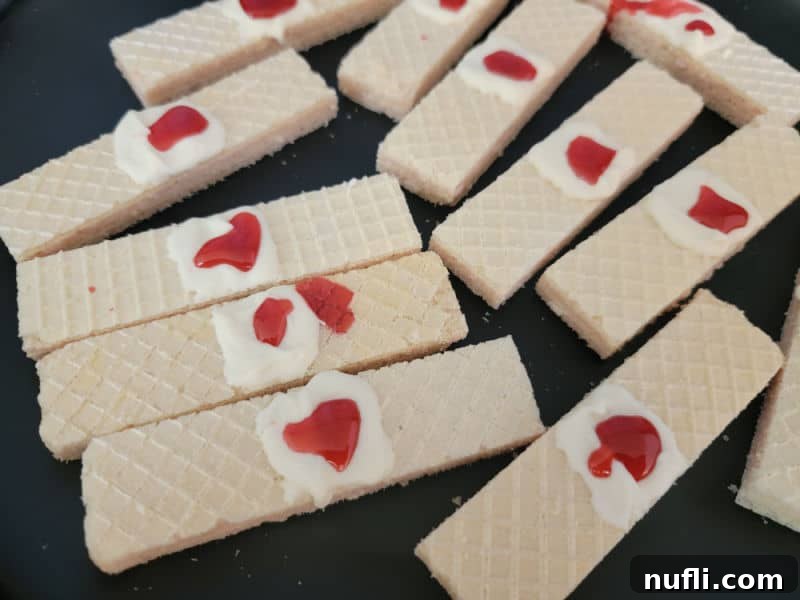
Step 3: Apply the “Bloody” Details for Maximum Spooky Effect
With your white chocolate “gauze pads” firm and ready, it’s time for the final, most fun step: applying the “blood”! Take your strawberry jam or edible fake blood and, using a toothpick or a small spoon, carefully dab and spread it onto the white square of each cookie. This is where your creativity comes into play! You can create different levels of “bloodiness” – from a subtle, fresh wound smear to a more dramatic, oozing effect. Use the toothpick to draw thin lines or create realistic drips around the edges of the white chocolate for an even more convincing look. The thicker consistency of jam or edible blood helps it stay in place, adding to the realism. Once you’re happy with the ghastly aesthetics, your Bloody Band-Aid Cookies are ready to scare and delight!
Tips for Perfect “Bloody Bandage” Presentation
While the steps are simple, a few extra touches can make your bloody band-aid cookies even more impactful:
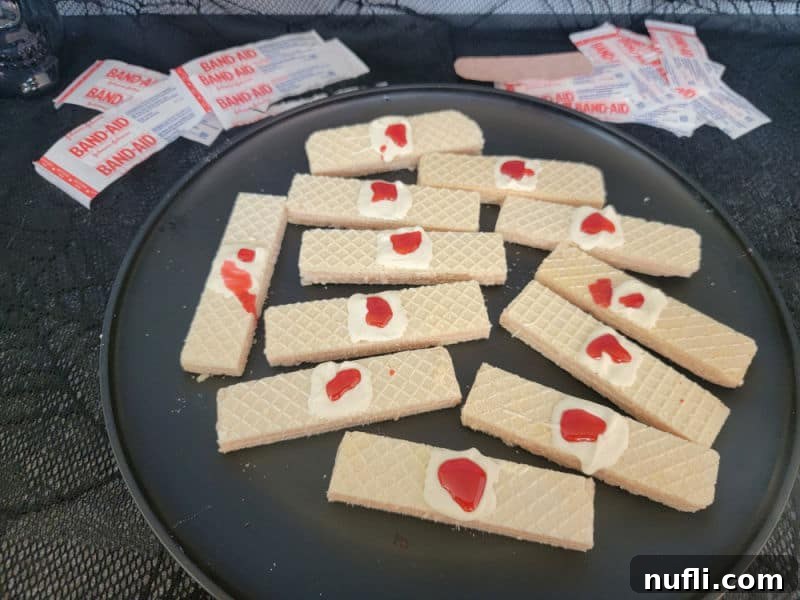
- Vary the “Wounds”: Don’t make every cookie identical. Some can have a small, neat drop of “blood,” while others can feature a more dramatic, smeared effect to look like a freshly removed bandage.
- Strategic Placement: Arrange them on a dark platter or a white plate with some black accents (like plastic spiders or cobwebs) to make the “blood” pop even more.
- Consider “Dirty” Accents: For an extra layer of realism, you could lightly dust some cookies with a tiny bit of crushed Oreo crumbs to simulate dirt or grime, creating “dirty” band-aids. (Ensure this fits with your overall theme and isn’t too literal for your guests!)
Preparation and Storage: Planning Your Halloween Haul
These Bloody Bandage Cookies are wonderfully convenient for party planning, as they can be made ahead of time, allowing you to focus on other Halloween preparations.
- Make Ahead: Yes, absolutely! These cookies are perfect for preparing a day or two before your Halloween party. Storing them properly will ensure they remain fresh and spooky until it’s time to serve.
- Storage: Once decorated, store your Bloody Bandage Cookies in an airtight container at room temperature. Layer them with parchment paper between each layer to prevent sticking and preserve their delicate decoration. They should stay fresh for about 3-4 days.
- Freezing/How to freeze: While plain sugar wafer cookies can be frozen in a freezer-safe container to extend their shelf life, we generally do not recommend freezing the decorated Bloody Bandage Cookies. The texture of the jam or edible blood, as well as the white chocolate, might change after thawing, potentially compromising the visual appeal and crispness of the wafer. For the best experience, enjoy them fresh or within a few days of preparation.
Recipe Variations: Customize Your Spooky Sweets
Part of the fun of DIY Halloween treats is the ability to customize them. Here are some ideas to tailor your Bloody Band-Aid Cookies to your preferences or dietary needs:
- Substitutions: Any flat, rectangular, or square cookie can work as a base. Think shortbread cookies, graham crackers, or even larger rectangular biscuits if you want bigger “band-aids.”
- Vegetarian Option: Good news! This recipe is inherently vegetarian, using only plant-based cookies, chocolate, and fruit spread.
- Vegan Option: To make these cookies fully vegan, simply ensure you use vegan-friendly sugar wafer cookies (check ingredient labels for dairy or eggs), vegan white chocolate melts (many brands are available), and, of course, fruit jam or a vegan edible blood substitute.
- Gluten-Free: For those with gluten sensitivities, opting for Gluten-Free Wafer Cookies or gluten-free graham crackers will make this recipe accessible for everyone.
- Smaller or Larger Serving Size: This recipe is incredibly flexible. Whether you need just a few spooky cookies for a movie night or a massive platter for a huge Halloween bash, you can easily scale the ingredients up or down to meet your exact needs. It’s perfect for making a dozen or hundreds!
Pairing Your Potent Patches: What to Serve with Band-Aid Cookies
These Bloody Band-Aid Cookies are fantastic on their own, but they also fit perfectly into a larger Halloween spread. Here are some ideas for what to serve alongside them to complete your spooky feast:
Spooky Snacks & Appetizers:
- Monster Munch: A sweet and salty snack mix perfect for grazing.
- Candy Corn and Peanuts: A classic, simple Halloween snack.
- Kool-Aid Pickles: For a truly unconventional and brightly colored treat.
- Salted Caramel Popcorn: A comforting autumn favorite.
- Ghost Pretzels: Another quick and easy chocolate-dipped treat.
More Delicious Halloween Desserts:
- Jack-o’-Lantern Pumpkin Rice Krispie Treats: Festive and chewy.
- Frankenstein Rice Krispie Treats: Adorable and easy to make.
- Witch Hat Cookies: Cute and magical.
- Reese’s Bats: A chocolate and peanut butter classic with a spooky twist.
- Marshmallow Ghosts: Simple, sweet, and melts in your mouth.
- Pretzel Skeleton Bones: Salty and sweet, perfect for a bone yard display.
- And, of course, plenty of Halloween Candy to fill those trick-or-treat bags!
Main Dishes/Entrées for a Full Feast:
- Mummy Quesadilla: A fun and easy savory option for kids and adults.
- Mummy Hot Dogs: A classic Halloween dinner staple.
- Halloween Pasta: A vibrant and festive main course.
When to Unleash Your Inner Mad Scientist: Occasions for Bloody Band-Aid Cookies
These “bloody” treats are versatile and can fit into many seasonal celebrations. Here are some ideal times to serve them:
- Halloween Parties: The most obvious choice! They’re guaranteed to be a hit.
- Horror Movie Nights: Perfect for a creepy-themed movie marathon with friends.
- Book Club Gatherings: If your club is reading a spooky novel, these are a fun, thematic snack.
- Haunted Houses: A great treat to serve to volunteers or guests after they survive a scare.
- Spooky Themed Events: Any gathering that embraces the eerie and unusual.
- Potlucks: Bring these, and you’ll definitely be the talk of the event!
- School Parties: Kids will get a kick out of the gross-out factor.
More Spooktacular Halloween Recipes to Explore
While my blog might not be overflowing with “gross-out” recipes (I’m working on it!), I do have a treasure trove of quick and easy Halloween-themed treats perfect for anyone with a sweet tooth or looking for simple festive ideas:
- Mummy Rice Krispie Treats
- Mummy Oreos
- Mummy Brownies
- Candy Corn Cheesecake
- Candy Corn Peanut Mix
- Strawberry Ghosts
Craving more delicious recipes? Dive into our extensive collection of copycat recipes, delectable dessert recipes, and our comforting Crock Pot Recipes for every occasion.
Stay connected with Tammilee Tips for all our latest recipe posts by following us on Facebook, Instagram, Pinterest, and Twitter!
Bloody Band Aid Cookies Recipe
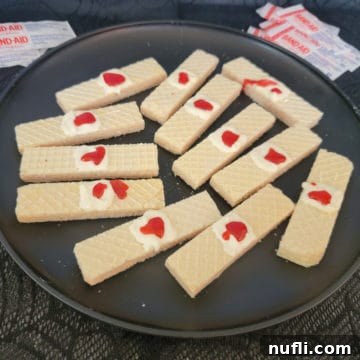
A delightfully creepy treat that’s incredibly simple to make, these Bloody Band-Aid Cookies are guaranteed to be a hit at any Halloween party.
- Prep Time: 5 minutes
- Total Time: 5 minutes
- Servings: 12 cookies
- Calories: Approximately 60 kcal per cookie
- Author: Tammilee Tips
Ingredients
- 12 Sugar Wafer Cookies (vanilla flavor recommended)
- 1 cup White Chocolate Candy Melts (or white almond bark/white icing)
- 2-3 tablespoons Strawberry Jam or Edible Fake Blood
Instructions
- Prepare a baking sheet by lining it with parchment paper. This will make cleanup easier, especially when dealing with the “blood.”
- In a microwave-safe bowl, melt the white chocolate candy melts in 30-second intervals, stirring well after each interval until smooth and fully melted.
- Using a butter knife or small spatula, carefully spread a rectangular patch of melted white chocolate onto the center of each sugar wafer cookie. This creates the “gauze pad” of your band-aid. Allow the chocolate to set completely, which can be expedited by placing the baking sheet in the refrigerator for a few minutes.
- Once the white chocolate has hardened, use a toothpick or a small spoon to dab and spread strawberry jam or edible fake blood onto the white chocolate patch. Create varying “bloody” effects – from a small smear to a more dramatic ooze – to enhance the spooky appeal.
- Serve immediately or store in an airtight container until your Halloween event.
Kitchen Tools
- Baking Sheet
- Parchment Paper
- Microwave-safe Bowl
- Butter Knife or Small Spatula
- Toothpicks (for detailing)
Notes
These spooky treats can be prepared ahead of time and stored in an airtight container at room temperature for up to 3-4 days. For best results and to maintain the cookie’s crispness, add the “blood” (jam/edible blood) closer to serving time if possible.
Nutrition Facts (per cookie, estimated)
- Calories: 60 kcal
- Fat: 1g (2% DV)
- Saturated Fat: 0.2g (1% DV)
- Sodium: 92mg (4% DV)
- Potassium: 25mg (1% DV)
- Carbohydrates: 11g (4% DV)
- Fiber: 0.5g (2% DV)
- Sugar: 3g (3% DV)
- Protein: 1g (2% DV)
- Calcium: 11mg (1% DV)
- Iron: 1mg (6% DV)
* Percent Daily Values are based on a 2000 calorie diet.
