Delightful Olaf Cookies: Your Ultimate Guide to Frozen-Themed Baking Fun!
Step into the enchanting world of Arendelle right in your kitchen with these absolutely adorable Olaf cookies! If you, like countless fans worldwide (myself included, even at 39!), have fallen under the spell of Disney’s Frozen and found yourself humming along to “Let It Go” or “Do You Want to Build a Snowman?” more times than you can count, then this baking adventure is for you. There’s something truly magical about the heartwarming tale of sisterly love, icy powers, and, of course, the charmingly naive snowman, Olaf.
Olaf, with his eternal optimism and dreams of summer, has captured the hearts of millions. What better way to celebrate this beloved character than by bringing him to life in edible form? These seriously cute Olaf cookies are more than just a treat; they’re a miniature piece of joy, perfect for Frozen-themed parties, movie nights, or simply brightening a snowy (or even a sunny!) day.
So, gather your ingredients, put on your favorite Frozen soundtrack, and let’s answer that iconic question with a resounding “Yes!” – we absolutely want to build a snowman… in cookie form!

Why Bake Olaf Cookies? The Joy of Indoor Winter Fun!
While the thought of “building a snowman” might conjure images of chilly outdoor adventures, our version involves a much warmer, cozier, and undeniably tastier experience! Forget the frostbite; we’re embracing the warmth of our kitchens to craft these delightful Olaf cookies. There’s an unmatched satisfaction in turning simple ingredients into edible works of art, especially when they bring a smile to everyone’s face, much like Olaf himself.
Baking is more than just following a recipe; it’s a creative outlet, a sensory journey, and a wonderful way to connect with loved ones. Imagine the laughter and joy as you decorate each unique Olaf face, from his twiggy arms to his carrot nose. These cookies aren’t just a dessert; they’re an experience, a memory in the making that celebrates the spirit of Frozen and the simple pleasure of homemade treats.
Ready to bring the magic of Arendelle into your kitchen? Here’s a detailed guide to creating those irresistible Olaf and snowflake cookies. This recipe is designed to be straightforward, ensuring that even novice bakers can achieve beautiful and delicious results.
The Ultimate Olaf & Snowflake Cookie Recipe
Prep and Bake Times at a Glance:
- Prep Time: 25 minutes
- Cook Time: 8 minutes
- Refrigeration Time: 6 hours (or overnight)
- Total Time (excluding decoration drying): Approximately 6 hours 33 minutes
- Yields: 12 delicious cookies
- Author: Tammilee Tips
Essential Cookie Ingredients:
For the perfect sturdy yet tender base for our decorated delights, you will need:
- 5 Cups all-purpose flour
- 2 teaspoons baking powder
- 1 teaspoon salt
- 1 ½ cups unsalted butter, softened to room temperature
- 2 cups granulated sugar
- 4 large eggs
- 1 teaspoon vanilla extract (added for flavor, common in sugar cookie recipes)
Royal Icing Ingredients:
This classic icing provides a smooth, hard finish, perfect for detailed cookie decorating.
- 2 large egg whites (ensure they are at room temperature for best results)
- 1 cup confectioners’ powdered sugar, sifted
- ½ teaspoon cream of tartar (helps stabilize egg whites and creates a glossier finish)
- Black, orange, & blue gel food coloring (gel colors offer vibrant hues without thinning the icing)
- Optional: ¼ cup additional powdered sugar (if needed for stiffness)
Required Kitchen Tools & Cookie Cutters:
Having the right tools makes all the difference in cookie decorating!
- Olaf Cookie Cutter (Shop here)
- Large Snowflake Cookie Cutter
- Mixing bowls (at least 4 for icing colors)
- Electric hand mixer or stand mixer
- Sifter
- Rolling pin
- Measuring cups and spoons
- Parchment paper
- Baking sheets
- Metal spatula
- Wire cooling rack
- Piping bags and #5 decorating tips (or small round tips)
- Wilton Foodwriter (black) (Shop here)
Cookie Directions: Crafting Your Perfect Base
Follow these steps carefully to create a tender, delicious sugar cookie that holds its shape beautifully for decorating.
- In a large mixing bowl, cream together the softened unsalted butter and granulated sugar until the mixture is light, fluffy, and no longer grainy to the touch. This step is crucial for incorporating air and creating a tender cookie.
- Add all 4 eggs to the creamed mixture at once. Continue to mix on medium speed until fully incorporated.
- Stir in the vanilla extract, ensuring it’s evenly distributed throughout the dough.
- In a separate bowl, sift together the all-purpose flour, baking powder, and salt. Sifting helps prevent lumps and ensures an even distribution of leavening agents.
- Gradually add the dry flour mixture to the wet ingredients, mixing on low speed until all ingredients are just thoroughly blended. Be careful not to overmix, as this can lead to tough cookies.
- Form the dough into a cohesive ball, wrap it tightly in plastic cling wrap, ensuring the entire dough ball is covered.
- Refrigerate the dough for a minimum of 6 hours, or ideally, overnight. This chilling period is essential for firming up the butter, which prevents the cookies from spreading too much during baking, ensuring they retain their intricate shapes.
- Once ready to bake, preheat your oven to 325°F (160°C).
- Remove the chilled cookie dough from the refrigerator and let it sit at room temperature for a short while (about 10-15 minutes) to soften slightly, making it easier to roll.
- Lightly flour your work surface (a wooden cutting board works well) and your rolling pin. If the dough is still too sticky, work a little extra flour into it.
- Roll out the dough to an even thickness (about ¼ inch is ideal) and use your Olaf and snowflake cookie cutters to create your desired shapes.
- Line your baking sheets with parchment paper. This prevents sticking and ensures even baking.
- Carefully transfer the cut cookie shapes to the parchment-lined baking sheets using a metal spatula.
- Bake for approximately 8 minutes at 325°F (160°C). Baking times may vary, so keep an eye on them. The cookies should be lightly golden at the edges but still soft in the center. Overbaking will make them hard.
- Once baked, remove the cookies from the oven and immediately transfer them to a wire rack to cool completely. They must be entirely cool before icing.
Royal Icing Preparation: Your Decorating Canvas
Achieving the perfect royal icing consistency is key to beautiful cookie decorations. This recipe yields a versatile icing that can be thinned for flooding.
- In a large mixing bowl, combine the egg whites, sifted confectioners’ powdered sugar, and cream of tartar. Mix on medium speed with an electric mixer for about 4 minutes, until the icing forms stiff peaks (it should hold its shape when you lift the beaters). This initial mix creates your “stiff” or “piping” consistency icing.
- If your icing feels too thin or not stiff enough, add an additional ¼ cup of powdered sugar, one tablespoon at a time, mixing until the desired consistency is reached.
- Now, it’s time to separate and color your icing for Olaf and snowflake details:
- Orange Icing: Scoop out 2 tablespoons of the stiff white icing into a small bowl. Add a few drops of orange gel food coloring and mix thoroughly until you achieve a vibrant orange for Olaf’s nose.
- Blue Icing: In a second small bowl, add 4 tablespoons of the stiff white icing. Incorporate several drops of blue gel food coloring and stir well to create a rich blue for the snowflake accents and Olaf’s mouth.
- Black Icing: In a third small bowl, add 4 tablespoons of the stiff white icing. Add several drops of black gel food coloring and mix until a deep black is achieved for Olaf’s features and outlines.
- White Icing: The remaining majority of the icing should remain white. This will be used for outlining and flooding the base of your cookies.
- Prepare your piping bags: Spoon each color of icing into individual frosting bags fitted with a #5 round decorating tip (or a similar small round tip). Twist the open end of each bag to push the icing down towards the tip, ready for use.
Bringing Olaf and Snowflakes to Life: Decorating Guide
This is where the real magic happens! Patience and a steady hand are your best friends here. Remember, practice makes perfect, and every Olaf will have his own unique charm!


Decorating Your Adorable Olaf Cookies:
- Outline and Flood Base: Using the stiff white icing in a piping bag, carefully outline the entire edge of each Olaf-shaped cookie. Allow this outline to dry for about 30 seconds.
- Prepare Flood Icing: While the outline dries, squeeze the majority of the remaining stiff white icing into a separate small bowl. Add about 1 teaspoon of water to this, mixing gently until it reaches a “flood” consistency (it should be fluid enough to spread but not so thin that it runs off the cookie). Leave a small amount of the stiffer white icing in its piping bag for later detailing.
- Fill Base: Once the outline is tacky, use the thinned white “flood” icing to fill in the outlined area. Gently spread the icing to the edges using a small spoon or a toothpick, ensuring an even, smooth surface. Allow this flooded base to dry for at least 30 minutes, or until set enough to touch without smudging. For best results, let it dry for several hours or even overnight before adding intricate details.
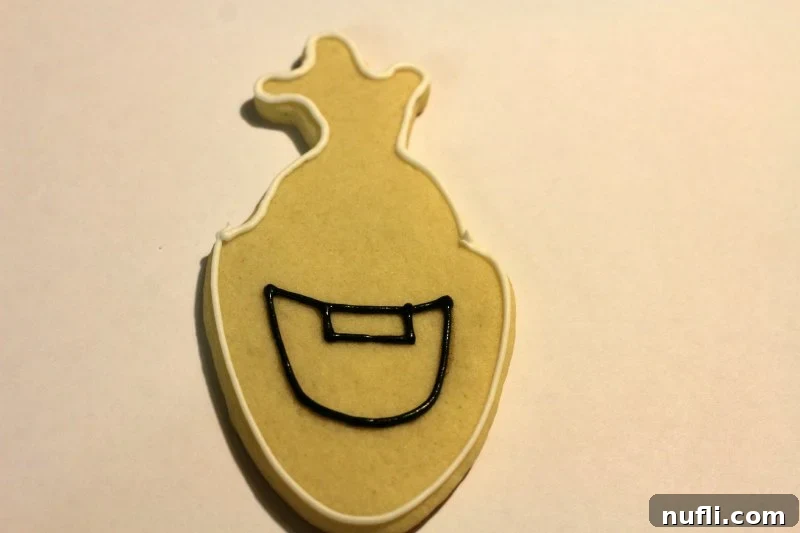
- Sketching Details with Foodwriter: Once the white base is completely dry, use a black Wilton Foodwriter to lightly sketch Olaf’s iconic features. Refer to pictures of Olaf for guidance. Draw his twiggy hair (branches), eyebrows, eyes, pupils, his carrot nose outline, and the outlines for his mouth and teeth. The foodwriter acts as a guide, making the piping steps easier.
- Black Icing Details: Following your foodwriter sketches, use the black piping icing to carefully go over the lines for Olaf’s hair, eyebrows, eyes, and the outline of his mouth and teeth. Pay special attention to making the lines crisp. Allow these black details to dry for about 30 seconds before moving on.
- Orange Nose: Once the black outlines around the eyes are dry, take your orange piping icing. Outline Olaf’s carrot nose first, then fill in the entire area with orange icing. Allow the nose to dry for at least 30 seconds.
- White Teeth: Carefully fill in the square outline you made for Olaf’s teeth with a small amount of the stiffer white icing you reserved. Let this dry for about 30 seconds.
- Blue Mouth Interior: With the blue piping icing, outline the inside of Olaf’s mouth. Then, using a small amount of slightly thinned blue icing (you can thin a tiny bit of blue with a drop of water if needed, similar to the white flood icing), fill in the mouth area.
- Final Drying: For your completed Olaf cookies to fully harden and prevent smudging during handling or storage, allow them to air dry for a significant period, typically 5-10 hours, or ideally overnight.
Designing Dazzling Snowflake Cookies:
Alongside Olaf, a collection of beautiful snowflake cookies adds to the magical winter theme.
- Outline and Flood Base: Just like Olaf, begin by outlining each snowflake cookie in white stiff icing. Let dry for approximately 30 seconds.
- Prepare Flood Icing: Squeeze the majority of your remaining stiff white icing into a bowl, add about 1 teaspoon of water, and mix to create a thinned “flood” consistency. Keep a small amount of stiffer white icing in its piping bag.
- Fill Base: Fill in the outlined snowflake cookie with the thinned white flood icing, spreading evenly. Allow this base layer to dry completely for several hours or overnight to prevent colors from bleeding.
- Sketching Details: Once the white base is dry, use a Wilton Foodwriter to lightly sketch the intricate snowflake patterns and details onto the cookie surface.
- Blue Icing Details: Following your foodwriter drawings, use the blue piping icing to “hi-light” or trace over these markings. Start by piping the main lines of the snowflake from top to bottom, then side to side. Allow these lines to partially dry for about 30 seconds to maintain definition.
- Accent Points: Next, add small accent points or dots at each end of the blue lines, creating the characteristic sparkle of a snowflake. Allow these to dry for 30 seconds.
- Center Dots: Finally, add five small dots of blue icing in the very center of the snowflake for a finished look.
- Final Drying: Ensure these decorated snowflake cookies also dry for 5-10 hours to completely set and harden.
Tips for Success and Storing Your Masterpieces
Creating these delightful Olaf and snowflake cookies is an enjoyable process, and a few extra tips can help ensure your baking and decorating experience is smooth and successful:
- Dough Consistency: If your cookie dough is too sticky after chilling, you can lightly flour your hands and knead in a tiny bit more flour, but do so sparingly to avoid tough cookies.
- Even Thickness: Aim for consistent dough thickness when rolling. This ensures all cookies bake evenly and have a uniform texture.
- Icing Drying Environment: For optimal drying of royal icing, ensure your drying area is clean, dust-free, and has good airflow. High humidity can significantly extend drying times.
- Troubleshooting Icing: If your royal icing is too thick for flooding, add water a single drop at a time, mixing well after each addition. If it becomes too thin, stir in a little more sifted powdered sugar.
- Storage: Once completely dry, store your decorated cookies in an airtight container at room temperature for up to two weeks. If stacking, place a piece of parchment paper between layers to prevent any damage to the delicate icing designs.
- Get Creative: Don’t be afraid to experiment! While our guide provides clear steps, feel free to add your personal touch to Olaf’s expression or the snowflake patterns.
Embark on More Culinary Adventures with Tammilee Tips!
We hope you had a fantastic time making these adorable Olaf and snowflake cookies! The joy of baking, especially when inspired by beloved stories, is truly a special experience. If you loved creating these festive treats, we have a treasure trove of other recipes waiting for you to explore.
Dive into our extensive collection for more delicious ideas:
- Discover familiar flavors with our Copycat Recipes, perfect for recreating your restaurant favorites at home.
- Satisfy your sweet tooth with a vast array of Dessert Recipes, from comforting classics to exciting new treats.
- For easy, fuss-free meals that taste like they’ve simmered all day, explore our delicious Crock Pot Recipes.
Stay connected and never miss out on our latest culinary inspirations, travel adventures, and lifestyle tips!
Follow Tammilee Tips on your favorite social media platforms:
Happy baking, and may your kitchen always be filled with warmth and wonderful aromas!
