Spooktacular Mummy Cake Pops: Your Ultimate Halloween Treat Guide
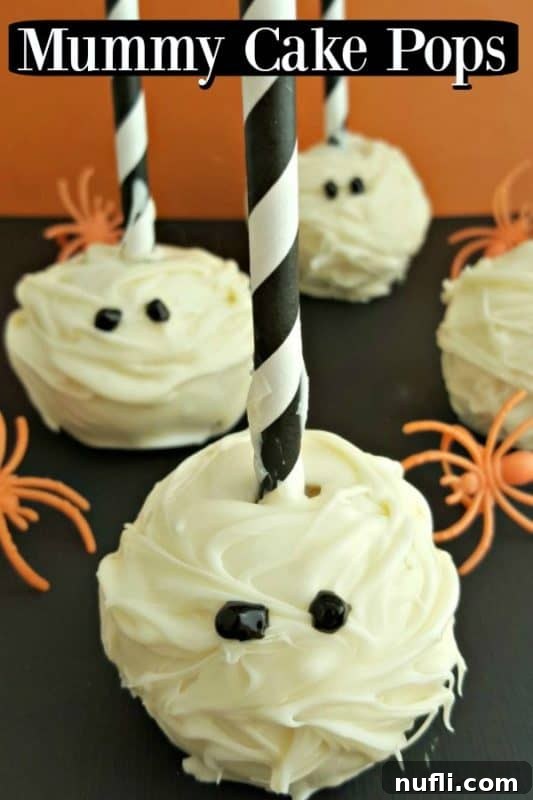
Get ready to conjure up some magic in your kitchen this Halloween with these incredibly fun and irresistibly sweet Mummy Cake Pops! Whether you’re hosting a ghoulish gathering or simply looking for a delightful activity to enjoy with family, these charming treats are guaranteed to be a hit. They combine the rich flavor of cake with a playful, spooky design, making them a centerpiece on any Halloween dessert table.

Why Mummy Cake Pops are the Ultimate Halloween Delight
Halloween is more than just a holiday; it’s an experience filled with costumes, decorations, and, most importantly, delicious themed treats! There’s a special kind of joy that comes from crafting edible masterpieces that perfectly embody the spirit of the season. Mummy Cake Pops, with their whimsical appearance and delightful taste, effortlessly capture that festive essence. They’re simple enough for beginner bakers yet impressive enough to wow your guests.
My passion for Halloween treats knows no bounds. It’s truly one of my most cherished times of the year, primarily because of the endless creative possibilities that open up in the kitchen. Every October, I eagerly anticipate sharing new and exciting recipes that promise to make your Halloween celebrations extra memorable. This year, we’re focusing on a timeless classic that is not only easy to prepare but also incredibly charming and utterly scrumptious.
Celebrating Halloween, No Matter Where We Are
How do you typically celebrate Halloween? Do you transform into your favorite character, or perhaps throw an epic party for friends and family? This year, my plans involve celebrating the holiday while on the go, which always introduces a unique and exciting dimension to our annual traditions. Last year, for instance, we envisioned an elaborate Halloween adventure exploring how Amsterdam embraced the spooky season. We dreamt of encountering unique decorations, participating in local events, and maybe even delving into some Dutch Halloween folklore. However, fate (or rather, an intense case of jet lag) had other plans, and we ended up sleeping through much of the city’s festivities, waking up only when Halloween was already a memory!
Despite the slight mishap, we still managed to soak in a bit of the holiday cheer. We enjoyed a couple of cleverly themed cocktails at our hotel bar and had fun observing other revelers before we finally crashed. This year, I’m determined to fully immerse ourselves in the Halloween experience, regardless of our destination. And no matter where our travels take us, these delightful Mummy Cake Pops will be a sweet, comforting reminder of the season, easy enough to prepare in advance or whip up quickly for an impromptu festive moment.
Your Guide to Creating Spooky Sweetness: Ingredients and Tools
Crafting these adorable Mummy Cake Pops is a surprisingly straightforward process. It involves combining a few common ingredients with some standard kitchen tools. This recipe is designed to yield approximately 40 festive cake balls, making them ideal for sharing with a large group or for having plenty on hand for multiple Halloween celebrations throughout the season.
Essential Ingredients for Your Mummy Cake Pops
You’ll be pleased to discover how basic and accessible the ingredient list is for these delightful treats. Most of these items are likely staples in your pantry or can be easily found at any local grocery store:
- White Chocolate Chips: You’ll need about 24 ounces (approximately 3-4 cups). This quantity ensures you have enough for a thorough coating and for creating those iconic “mummy wrappings.” Opt for a good quality white chocolate as it melts more smoothly and provides a better finish.
- White Cake Mix: One standard box (usually 15.25 ounces), along with all the additional ingredients required on its packaging (typically eggs, oil, and water). While a white cake mix creates a classic, clean base, feel free to get creative! A vanilla cake mix works beautifully, or for a fun twist, try a chocolate cake mix for a delicious surprise inside your mummy.
- Vanilla or Cream Cheese Frosting: Approximately ½ cup. This frosting is the magical binder that transforms your crumbled cake into a pliable, moldable dough, giving your cake pops their perfect consistency. It also infuses them with an extra layer of delicious flavor. You can use pre-made frosting for convenience or whip up a homemade batch if you prefer.
- Black Gel Writing Frosting: This is absolutely essential for bringing your mummies to life by drawing their distinctive eyes. A fine-tip gel pen offers the best control for adding those small, precise details.
Indispensable Equipment for Crafting Perfect Cake Pops
Having the right tools at your disposal can significantly impact the ease and success of your Mummy Cake Pop project, ensuring they turn out beautifully shaped and professionally decorated. Here’s a detailed look at the equipment you’ll need:
- Paper Straws or Lollipop Sticks: You’ll need around 40 of these. They are crucial for serving your cake pops in the classic, handheld lollipop style, making them easy to eat and display.
- Large Mixing Bowl: A sturdy and spacious mixing bowl is paramount for crumbling your baked cake and thoroughly combining it with the frosting. We are particularly fond of glass batter bowls equipped with a handle, as they offer excellent stability and ease of maneuverability during the mixing process. This design helps to keep the bowl steady on your countertop, preventing accidental spills and ensuring a much smoother preparation experience.
- Hand Mixer / Stand Mixer: While you can certainly mix the cake and frosting by hand, an electric mixer—either a hand mixer or a stand mixer—will guarantee a more uniformly combined and impeccably smooth mixture. This saves you considerable time and effort, especially when preparing a larger batch of cake pops.
- Heat-Resistant Potholders: Kitchen safety should always be a top priority! These are indispensable for safely handling hot items, especially when you’re melting chocolate. After a frightening incident where a cloth potholder caught fire, we exclusively use silicone or other highly heat-resistant options. Investing in quality, heat-resistant potholders is a smart and safe choice for any kitchen.
- Parchment Paper: A true unsung hero of the kitchen! Lining your baking sheets with parchment paper makes cleanup incredibly simple and, more importantly, prevents your delicate cake pops from sticking. It’s an absolute game-changer for virtually any baking endeavor.
- Baking Sheet with Sides: This is essential for chilling your cake pops and for catching any stray chocolate drips during the coating process. The raised sides are a thoughtful design feature that prevents any unfortunate incidents of cake pops rolling off onto the floor (and yes, that has happened, and we learned our lesson!).
- Small, Deep Bowl for Melting Chocolate: Although not always explicitly listed, a microwave-safe bowl or a double boiler setup is crucial for melting your chocolate. A deep, narrow bowl is ideal for dipping, as it allows the cake pop to be fully submerged with less chocolate.
Easy Mummy Cake Pops Recipe: Step-by-Step
These adorable and utterly delicious Mummy Cake Pops are the perfect addition to any Halloween party or simply a wonderfully fun activity to do with the family. Follow our detailed instructions to create your own batch of spooktacular treats!

How to Make Mummy Cake Pops
Learn how to create cute and fun Mummy Cake Pops—a truly spooktacular treat perfect for your Halloween celebrations!
25
minutes
30
minutes
55
minutes
40 Cake Pops
Tammilee Tips
Ingredients
- 24 Ounce white chocolate chips
- 1 white cake mix (plus required ingredients like eggs, oil, water)
- ½ cup Vanilla or Cream Cheese Frosting (pre-made or homemade, ensure it’s thick)
- Black Icing Pen (gel writing frosting for eyes)
- Paper straws or lollipop sticks (approx. 40 pieces)
Instructions
- Bake the Cake: Begin by preparing and baking your chosen white cake mix exactly as directed on its package. Once the cake is baked, transfer it to a wire rack and allow it to cool completely. This step is crucial for achieving the correct consistency for your cake pops.
- Crumble and Mix: After the cake has thoroughly cooled, crumble it into very fine crumbs inside a large mixing bowl. Add the ½ cup of vanilla or cream cheese frosting to the cake crumbs. Mix these two ingredients thoroughly until you achieve a moist, dough-like consistency that holds together when pressed. You can mix by hand (which can be quite therapeutic!) or use an electric mixer on a low setting for efficiency.
- Form and Chill: Roll the cake mixture into uniform 1-inch balls. For consistency in size, a small cookie scoop can be a very helpful tool here. Gently insert a paper straw or a lollipop stick about halfway into each cake ball. Arrange the formed cake balls on a baking sheet lined with parchment paper. Chill them in the refrigerator for approximately 1 hour, or if you’re in a hurry, in the freezer for about 30 minutes. This chilling process is vital as it helps the cake pops firm up, preventing them from falling off their sticks during the dipping stage.
- Melt the Chocolate: Melt the white chocolate chips following the instructions on their packaging. This is typically done in a microwave-safe bowl in 30-second bursts, stirring well after each interval to prevent burning, or using a double boiler method for a gentler melt. Ensure the chocolate is completely smooth, lump-free, and has a good dipping consistency.
- Dip the Cake Pops: Take one chilled cake pop and hold it by its stick. Dip the entire cake ball into the melted white chocolate, ensuring it’s fully coated. Gently tap the stick against the edge of the bowl to allow any excess chocolate to drip off. If necessary, you can use a clean fork to carefully guide the cake pop and lift it out, taking care not to damage the delicate ball.
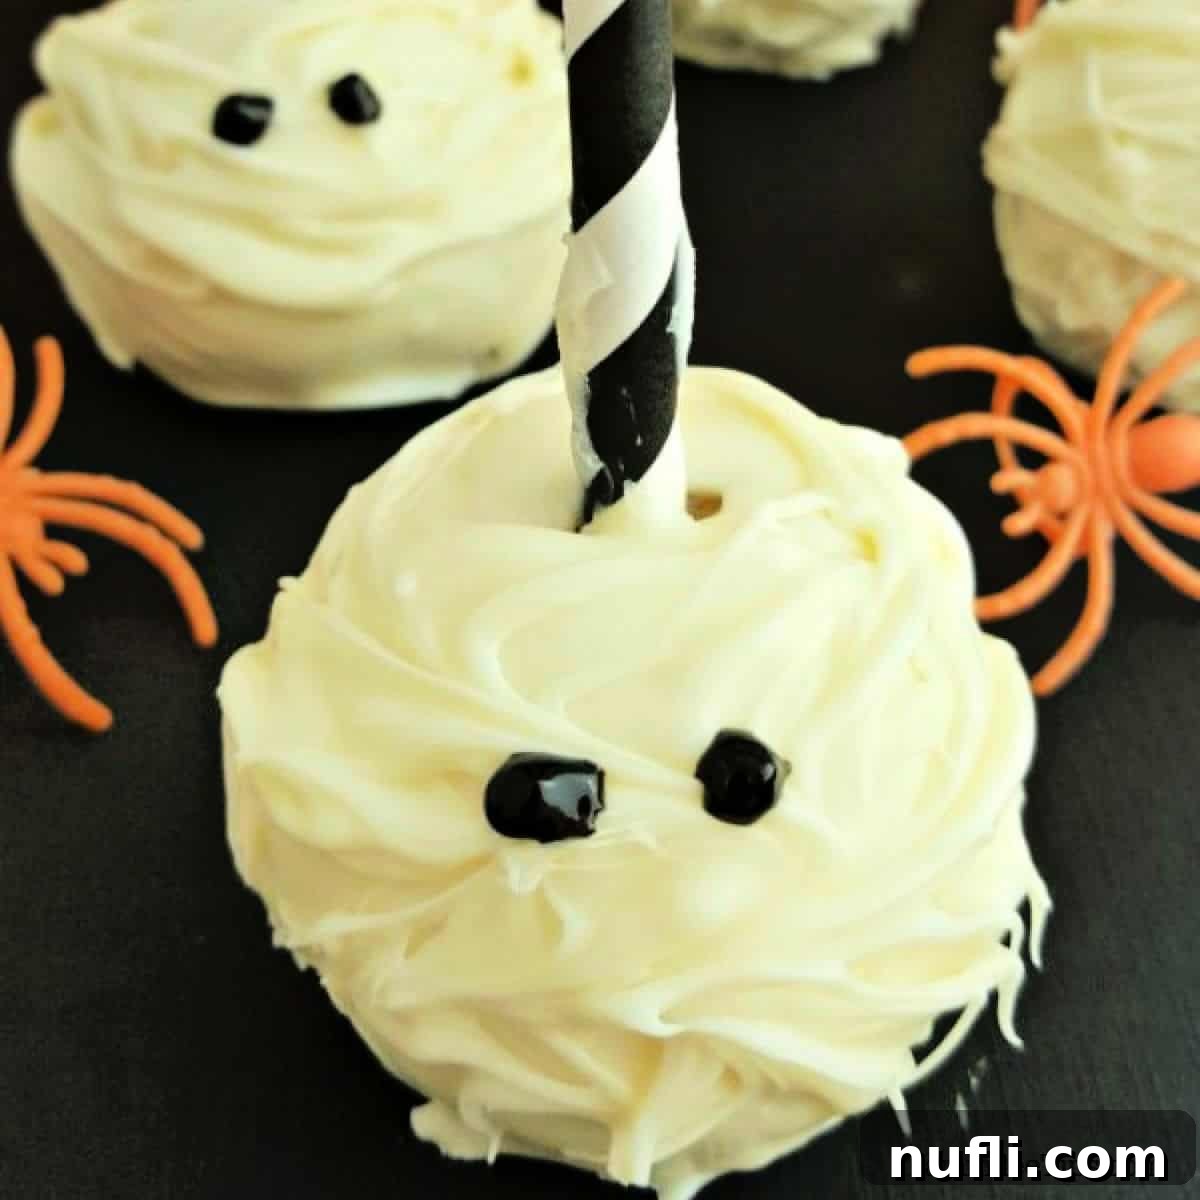
- Create Mummy Wrappings: While the first layer of white chocolate coating is still wet, dip a clean fork into the remaining melted white chocolate. Drizzle the chocolate back and forth over the coated cake pop in a criss-cross pattern. This technique creates the distinctive bandage-like effect of a mummy’s wrapping. Repeat this process for all your cake pops, placing them back on the parchment-lined baking sheet to allow the chocolate to set and harden.
- Add the Eyes: Once the white chocolate on your cake pops has completely hardened and set, it’s time for the final touch. Use your black gel writing frosting to carefully draw two small “eyes” on each mummy cake pop. You can make them simple dots, small circles, or even tiny ovals for a more expressive or eerie look. Allow this frosting to set completely before handling or serving your delightful Mummy Cake Pops.
Kitchen Tools You’ll Need
- Hand Mixer or Stand Mixer
- Large Mixing Bowl
- Parchment Paper
- Baking Sheets with Sides
- Lollipop Sticks or Paper Straws
- Heat-Resistant Potholders
- Small, Deep Bowl for Melting Chocolate
Nutrition Facts
Calories from Fat 54
Expert Tips for Perfectly Spooky Mummy Cake Pops
Achieving picture-perfect Mummy Cake Pops is easier than you think with these helpful tips and tricks:
- Optimal Cake Crumb Consistency: Always ensure your baked cake is completely cooled before you start crumbling it. Warm cake tends to be too moist and difficult to manage, often resulting in a sticky, unmanageable mixture. Crumble the cake very finely to ensure your cake balls are smooth and uniform.
- Mastering the Frosting Ratio: The ideal amount of frosting can vary slightly depending on how moist your particular cake turns out. It’s best to add the frosting gradually, mixing until the cake mixture is cohesive enough to be easily rolled into balls, but not overly sticky or greasy. If it’s too sticky, add a touch more crumbled cake; if too dry, a tiny bit more frosting.
- The Importance of Chilling: Do not skip the chilling step! Cold cake balls are significantly firmer, making them much easier to dip into melted chocolate without falling apart or sliding off the sticks. This also helps the chocolate set faster.
- Flawless Chocolate Melting: When melting your white chocolate, do so slowly and stir frequently to prevent it from scorching or seizing. If your melted chocolate seems too thick for dipping, you can thin it out with a small amount of coconut oil or vegetable shortening (start with ½-1 teaspoon per cup of chocolate) to achieve a smoother, more fluid consistency.
- The “Glue” Dip for Sticks: For extra security, dip the very tip of your lollipop stick into the melted chocolate before inserting it into the cake ball. This acts as a delicious “glue” that helps firmly secure the cake ball to the stick, preventing unfortunate mid-dip mishaps.
- Drizzling for Authentic Mummy Wraps: To achieve the best mummy effect, work relatively quickly when drizzling the chocolate for the “bandages.” Ideally, apply the drizzle while the base coat of white chocolate is still slightly wet, or immediately after dipping. If the base coat hardens too much, the drizzled chocolate might not adhere as well.
- Precise Eye Drawing: Always wait until the white chocolate coating has completely hardened and set before attempting to draw the eyes with the black gel frosting. This prevents any colors from bleeding into each other. If you’re new to using icing pens, a quick practice run on a piece of parchment paper can boost your confidence!
Creative Variations for Your Spooky Cake Pops
While the classic white mummy look is undoubtedly charming and iconic for Halloween, there’s no need to limit your creativity! Feel free to experiment with these fun variations to make your cake pops truly unique:
- Monster Mash-Up Eyes: Instead of just black, use different colored gel frostings for the eyes—think vibrant green, eerie yellow, or blood-red for a truly monstrous look. You could even attach small candy eyeballs with a dot of melted chocolate for a more whimsical, cartoonish aesthetic.
- Flavor Frenzy: Don’t stick to just white cake! Experiment with different cake flavors to surprise your guests. A chocolate cake mix with chocolate frosting inside for a “dark” or “shadow” mummy is a delicious alternative, or try red velvet cake for a ghoulishly good treat with a vibrant interior.
- Spooky Sprinkles: Before your white chocolate coating hardens completely, immediately sprinkle on some festive Halloween-themed sprinkles. Bats, ghosts, pumpkins, or even simple orange and black jimmies can add an extra layer of flair and texture.
- Colorful Wraps: Elevate your mummies by dipping your cake pops in colored candy melts (such as vibrant orange, spooky green, or regal purple) for the base coat, then drizzle with white chocolate for a striking and colorful mummy effect.
- Spiderweb Design: For a different kind of spooky decoration, after dipping your cake pop in a solid color (like orange or green candy melt), immediately add a small dot of contrasting melted chocolate (like black or white) on top. Then, use a toothpick to drag lines from the center dot outwards to create an intricate spiderweb pattern.
More Spooktacular Halloween Fun and Recipes
If you thoroughly enjoyed creating these Mummy Cake Pops, then you’re in for an even bigger treat! Our website is a treasure trove of Halloween-themed content, ranging from laugh-out-loud jokes to an array of delicious desserts, all designed to keep the spooky fun alive throughout the season. Dive into some of our other popular Halloween articles and recipes:
- 100+ Halloween Jokes: Perfect for sharing with trick-or-treaters or at your next spooky gathering, this collection guarantees giggles.
- Candy Corn Cocktail: A delightfully festive and vibrant drink, specifically crafted for the adults at your Halloween party.
- Candy Corn White Chocolate Bark: Another incredibly easy and visually striking candy corn-themed treat that’s perfect for sharing.
- Halloween Games for the Entire Family: Discover a variety of creative and engaging ideas to keep everyone entertained, from the littlest toddlers to the coolest teens.
- Frankenstein Rice Krispie Treats: These simple, no-bake treats are not only adorable but also a quick and easy way to add a monstrous touch to your dessert spread.
Don’t forget to explore our comprehensive collection of Halloween Recipes for even more culinary inspiration! Furthermore, we boast a fantastic selection of fun Cake Mix recipes that are consistently quick, easy, and always a crowd-pleaser for any occasion.
Explore More Delicious Recipes from Our Kitchen
Beyond the festive spirit of Halloween, our kitchen is perpetually bustling with wonderful new creations! If you consider yourself a true recipe enthusiast, you will absolutely love diving into our extensive and diverse categories of culinary delights:
- Copycat Recipes: Master the art of recreating your favorite restaurant dishes and beloved fast-food items right in the comfort of your own home.
- Dessert Recipes: Indulge your sweet tooth with our vast and varied array of delicious treats, ranging from classic comforts to innovative delights.
- CrockPot Recipes: Discover a wealth of easy, convenient, and flavorful meals perfect for busy weekdays or lazy weekends, all made effortlessly in your slow cooker.
Stay Connected and Never Miss a Treat with Tammilee Tips!
Don’t miss out on our very latest recipes, exciting travel adventures, and practical lifestyle tips! Make sure to follow Tammilee Tips on all your favorite social media platforms to stay updated and inspired:
Love this recipe? Follow @TammileeTIps on Pinterest for more fantastic ideas and delicious inspiration!
Tried this recipe? We’d love to see your creations! Mention @TammileeTipsLife when you share a photo of your Mummy Cake Pops on Instagram!
