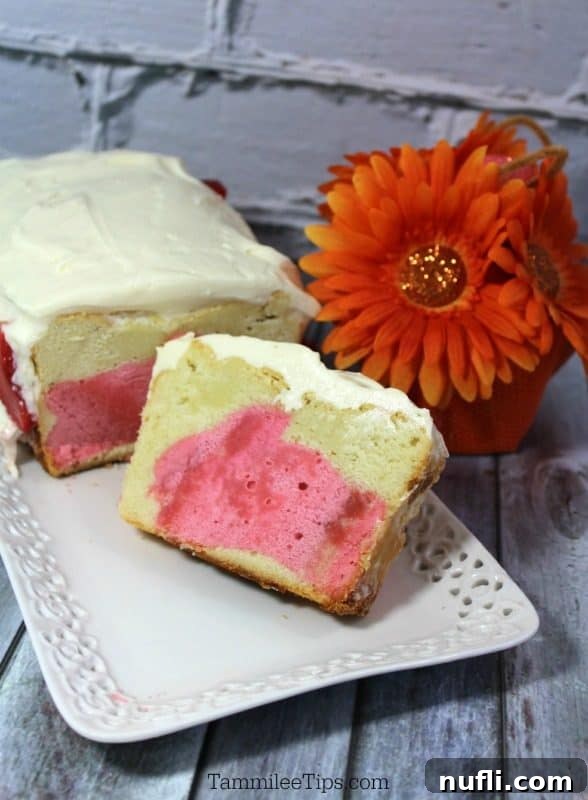
Prepare to delight your guests with a show-stopping dessert that’s as enchanting as it is delicious: the Easter Bunny Pound Cake. This delightful creation isn’t just a cake; it’s a magical moment waiting to be unveiled. Imagine the gasps of joy and surprise when you slice into a seemingly ordinary pound cake, only to reveal a charming pink bunny baked right into its center. It’s a truly unforgettable addition to any Easter brunch, lunch, or even a casual family gathering, guaranteed to bring smiles to faces of all ages. What might appear intricate at first glance is surprisingly manageable, requiring just a few thoughtful steps to achieve this spectacular result. The effort is minimal compared to the immense delight it brings.

The Magic Behind the Easter Bunny Pound Cake: A Recipe for Joy
There’s an undeniable charm in a dessert that holds a secret, and this Easter Bunny Pound Cake recipe perfectly captures that whimsical spirit. This isn’t just about baking a cake; it’s about crafting an experience. For children, discovering a hidden bunny within their slice of cake is pure magic, echoing the wonder of finding Easter Bunny tracks on the driveway or colorful eggs in the garden. This dessert taps into that childlike wonder, making it a centerpiece that sparks conversation and creates cherished memories. It’s a testament to the joy of simple surprises, transforming a classic pound cake into a canvas for Easter cheer.
Mastering the Classic Pound Cake Base
At the heart of our delightful bunny cake lies a perfectly baked pound cake. A true pound cake earns its name from its traditional recipe calling for a pound each of butter, sugar, eggs, and flour. This simple ratio yields a dense, rich, and wonderfully moist cake with a fine crumb – an ideal canvas for our hidden design. The key to its success lies in attention to detail, especially regarding ingredient temperature and mixing technique. Using softened butter and room-temperature eggs is crucial for achieving a smooth, emulsified batter that bakes evenly and prevents a dense, greasy texture. The creaming method, where butter and sugar are beaten together until light and fluffy, incorporates air, giving the cake its tender structure.
A Detailed Guide to Ingredients: Building Flavor and Texture
The beauty of this Easter Bunny Pound Cake lies in the quality and precise balance of its ingredients. Each component plays a vital role in achieving the perfect flavor and texture, ensuring your cake is not only visually stunning but also incredibly delicious.
- 1 lb Softened Butter: This is the foundation of any good pound cake. Using softened (but not melted) butter is essential for proper creaming with sugar, which incorporates air and creates a light, fluffy texture. Butter also contributes rich flavor and moisture.
- 3 C Sugar: Granulated white sugar not only sweetens the cake but also contributes to its tender crumb and golden crust. When creamed with butter, it helps to create air pockets, further enhancing the cake’s texture.
- 6 Large Eggs: Eggs act as a leavening agent, binding ingredients, and adding richness and structure. Using large, room-temperature eggs allows them to incorporate more easily into the batter, preventing curdling and promoting a smoother consistency.
- 4 C All-Purpose Flour: Flour provides the structure for the cake. All-purpose flour is ideal for pound cakes, offering a good balance of protein that results in a tender yet sturdy crumb.
- ¾ C Milk: Milk adds moisture and tenderness to the cake, contributing to its luscious texture without making it too heavy.
- 1 Teaspoon Almond Extract: While vanilla is a classic, almond extract introduces a subtle, sophisticated nutty note that beautifully complements the rich butter flavor, making the cake taste extra special.
- 1 Teaspoon Vanilla Extract: A staple in most baking, vanilla extract enhances all the other flavors in the cake, adding a warm, aromatic depth.
- Several Droplets of Pink Food Coloring: This is where the magic happens! Gel food coloring is often preferred for its vibrant pigment and minimal liquid addition, ensuring a rich, festive pink hue for your hidden bunnies.
Step-by-Step Baking Instructions with Pro Tips: Crafting Your Masterpiece
Creating this stunning Easter Bunny Pound Cake involves a few distinct stages, each vital to the final reveal. Follow these detailed steps for a truly impressive outcome:
- Cream the Butter: Begin by beating the softened butter with an electric mixer at medium speed until it achieves a light yellow, creamy consistency. This process, known as creaming, is fundamental. It can take anywhere from 1 to 7 minutes, depending on the butter’s initial softness and your mixer’s power. Look for a noticeable change in color and texture.
- Add Sugar and Achieve Fluffiness: Gradually add the sugar to the creamed butter, continuing to beat at medium speed. The mixture should become even lighter in color and incredibly fluffy, almost white. This ensures the sugar crystals dissolve well and more air is incorporated, which is critical for a tender pound cake.
- Incorporate Eggs, One by One: Add the large eggs, one at a time, beating just until each yellow yolk disappears into the batter before adding the next. This allows each egg to fully emulsify into the mixture, creating a smooth batter and preventing it from curdling.
- Alternate Flour and Milk: Begin and end with flour when adding it to the creamed mixture. Add approximately 1 cup of flour, followed by ¼ cup of milk, alternating until all flour and milk are incorporated, ending with the last cup of flour. Beat at a low speed after each addition, just until combined. Overmixing at this stage can develop the gluten in the flour too much, leading to a tough cake. If you notice any stubborn lumps, gently fold them in with a rubber spatula.
- Stir in Extracts: Once the batter is smooth, gently stir in the almond and vanilla extracts. Their aromas will immediately begin to infuse the mixture.
- Divide and Color the Batter: Carefully divide the prepared batter into two equal halves. To one half, add a few drops of pink food coloring. Blend it thoroughly to ensure an even, vibrant pink hue throughout this portion of the batter. The consistency should be uniform.
- Bake the Pink Batter: Lightly treat a medium-sized cookie sheet with baking spray or grease and flour. Pour or spoon the pink-tinted batter evenly onto the prepared cookie sheet. Bake for approximately 1 hour. To check for doneness, insert a toothpick into the center; if it comes out clean, the cake is ready. Set this pink cake aside to cool completely.
- Prepare for Assembly: While the pink cake cools, perform a crucial test: ensure your chosen bunny cookie cutter fits comfortably within your loaf pan, both in height and width. This step is vital to guarantee your bunnies will stand correctly and be fully encased.
- Cut Your Bunnies: Once the pink cake is completely cool, use your bunny-shaped cookie cutter to cut out as many bunny shapes as possible. These will form the adorable surprise center of your pound cake.
- Prepare the Loaf Pan: Treat your loaf pan generously with baking spray, or grease and flour it thoroughly to prevent sticking. This ensures easy release after baking.
- Layer the White Batter: Pour about one-third of the plain, uncolored batter into the bottom of the prepared loaf pan, creating a base layer.
- Position the Bunnies: Carefully stand your pink bunny cut-outs upright in a single line down the middle of the loaf pan, pressing them gently into the base batter to keep them stable. You may need to hold them steady for a moment until they can stand on their own. Ensure they are evenly spaced.
- Fill the Sides: Gently spoon the remaining plain batter around the sides of the standing bunnies, being careful not to dislodge them. Fill the pan until the sides are level with the top of the bunnies.
- Cover the Bunnies: Once the sides are filled, gently spoon additional plain batter on top of your bunnies, continuing until they are completely covered and the batter is even across the top of the pan. Smooth the surface with a spatula.
- Bake the Loaf Cake: Bake the pound cake in your preheated oven at 300 degrees Fahrenheit (150 degrees Celsius) for approximately 1 hour and 40 minutes. Again, test for doneness by inserting a toothpick into the center; if it comes out clean, the cake is ready.
- Cool and Release: Allow the cake to cool in the loaf pan on a wire rack for 10-15 minutes. This cooling period helps the cake firm up slightly before removal.
- Final Cooling: If the cake seems difficult to remove, run a thin knife carefully around the edges of the pan to loosen it. Invert the pan onto the wire rack to fully remove the cake. Let it cool completely on the wire rack before slicing. Slicing too early can cause it to crumble and won’t reveal the clean bunny shape.
Serving and Presentation Ideas
Once your Easter Bunny Pound Cake is completely cooled, the moment of truth arrives! Slicing it reveals the adorable pink bunny within, making for a truly spectacular presentation. To elevate its appeal, consider dusting the top with a light layer of powdered sugar, creating a delicate snowy effect. You could also serve slices with a dollop of freshly whipped cream and a scattering of fresh berries like strawberries or raspberries, which add a vibrant color contrast and a touch of freshness. For an extra festive touch, a few edible flower petals or some pastel sprinkles can transform each plate into a mini work of art. This cake is rich enough to stand on its own but equally delightful with a cup of coffee or tea.
Storage and Make-Ahead Tips
This pound cake not only looks impressive but also stores beautifully, making it an excellent option for preparing ahead of your Easter celebrations. Once completely cooled, the Easter Bunny Pound Cake can be stored at room temperature in an airtight container for up to 3-4 days. For longer storage, you can freeze the cake. Wrap individual slices or the entire cooled cake tightly in plastic wrap, then in aluminum foil, and store in the freezer for up to 2-3 months. Thaw frozen cake overnight in the refrigerator, then bring to room temperature before serving for the best texture and flavor. This makes it a convenient option for busy holiday schedules.
More Delicious Easter Recipes to Complete Your Feast
No Easter celebration is complete without an array of delectable dishes to complement your enchanting bunny cake. Explore some of our other cherished recipes perfect for your holiday spread:
- Crockpot Ham: A wonderfully tender and flavorful ham that’s effortlessly prepared, leaving your oven free for other dishes.
- Easter Chick Cupcakes: Adorable and tasty cupcakes that are almost too cute to eat, perfect for kids and adults alike.
- Carrot Strawberries: A creative and healthy-ish treat disguised as mini carrots, adding a pop of color and freshness.
- Orange Glazed Ham: A zesty and sweet ham option, slow-cooked to perfection with a bright citrus glaze.
- Slow Cooker Creamed Corn: A comforting and creamy side dish that’s incredibly easy to make in your slow cooker.
Whether you’re looking for main courses, festive sides, or more sweet treats, our collection of recipes ensures your Easter menu is complete and memorable. Don’t forget to check out our extensive range of copycat recipes, irresistible dessert recipes, and convenient CrockPot Recipes for every occasion.
Stay connected and discover even more culinary inspiration by following Tammilee Tips on MSN, Facebook, Instagram, and Pinterest, where we share all our latest and greatest recipe posts!

Easter Bunny Pound Cake Recipe
Print
Rate
Ingredients
- 1 lb Butter softened
- 3 C White Sugar
- 6 large eggs
- 4 C All Purpose Flour
- ¾ C Milk
- 1 Teaspoon Almond Extract
- 1 Teaspoon Vanilla Extract
- Several droplets of pink food coloring.
Instructions
- Beat butter at medium speed with an electric mixer until creamy and light yellow. This can take 1 to 7 minutes.
- Add sugar, beating at medium speed until the mixture is light and fluffy (the butter will turn to a fluffy white).
- Add eggs, one at a time, beating just until each yellow yolk disappears into the batter.
- Next, alternately add flour and milk to the creamed mixture, starting and ending with flour. Add 1 cup of flour, followed by ¼ cup of milk, repeating until all are incorporated.
- Beat at a low speed after each addition until just combined. If lumps remain, gently stir with a rubber spatula to avoid overmixing.
- Gently stir in the almond and vanilla extracts.
- Divide your prepared batter evenly in half.
- Add a few drops of pink food coloring to one half of the batter.
- Blend the pink food coloring thoroughly to ensure even coloring throughout that portion of the batter.
- Spray a cookie sheet with non-stick spray or grease and flour. Pour or spoon the pink-tinted batter onto the prepared cookie sheet, spreading it evenly.
- Bake the pink batter on the cookie sheet for approximately 1 hour.
- Test for doneness by inserting a toothpick into the center; if it comes out clean, it’s done.
- Set the pink cake aside on a wire rack to cool completely.
- Measure to ensure your bunny cookie cutter fits within your loaf pan, checking both height and width.
- Once the pink cake has cooled, use your bunny cookie cutter to cut out the bunny shapes. These will be placed in your loaf pan.
- Treat your loaf pan with baking spray or thoroughly grease and flour it.
- Pour about one-third of the plain batter into the bottom of the loaf pan to create a base layer.
- Gently stand your pink bunny cut-outs in a line down the middle of the loaf pan. Hold them steady for a moment until they can stand on their own within the batter.
- Gently fill the sides of the pan by spooning the remaining plain batter around the standing bunnies, careful not to dislodge them.
- After the sides are filled, gently spoon additional plain batter on top of your bunnies to fully cover them.
- Continue to spoon additional batter on top until the surface is even and smooth.
- Bake at 300 degrees Fahrenheit (150°C) for 1 hour and 40 minutes.
- Check for doneness by inserting a toothpick into the center of the loaf. If it comes out clean, your pound cake is done.
- Cool the cake in the pan on a wire rack for 10-15 minutes.
- Remove the cake from the pan.
- If the cake is difficult to remove, gently run a knife between the edges of the cake and the pan to loosen it before inverting.
- Cool the pound cake completely on your wire rack before slicing to reveal the hidden bunnies and enjoy!
Originally posted March 16, 2016
