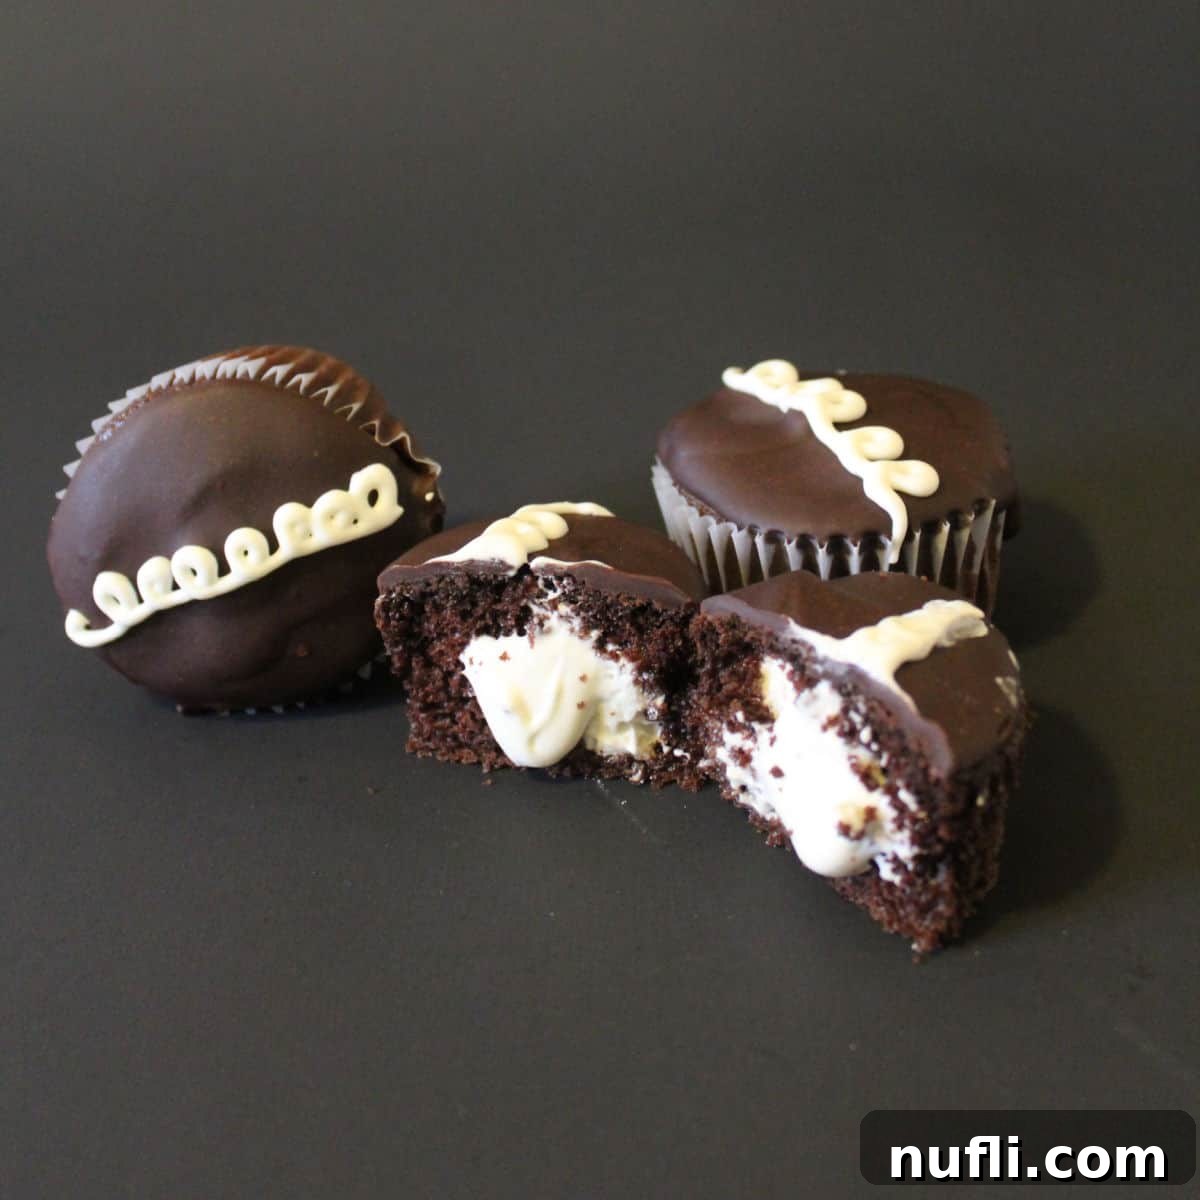
There’s a certain magic that comes with biting into a classic Hostess Chocolate Cupcake – that moist chocolate cake, the iconic creamy filling, and the unmistakable chocolate ganache shell with its signature white swirl. For many, it’s a taste of childhood, a sweet memory wrapped in dark chocolate. What if you could capture that magic right in your own kitchen? Get ready to bake up some pure nostalgia because our ultimate copycat Hostess chocolate cupcakes recipe is here to guide you every step of the way!
Bake Your Own Delicious Copycat Hostess Chocolate Cupcakes
Remember the joy of unwrapping a Hostess cupcake from its cellophane packaging? The anticipation of that first bite, the rich chocolate, and the surprise of the creamy center? Now, imagine creating that exact experience from scratch, perhaps even making them taste a little bit better, knowing they’re homemade with love. Our recipe focuses on delivering that authentic flavor profile and texture, making these chocolate treats incredibly satisfying for both bakers and eaters alike.
We recently shared our Homemade Twinkies recipe, and the feedback was incredible! It proved that nostalgic treats made at home are always a hit. Following that success, we’re thrilled to present these copycat Hostess chocolate cupcakes. They are not only a blast to make but also deliver on taste, texture, and that signature look. The chocolate shell, in particular, isn’t just for show; it acts as a protective layer, keeping the cupcakes wonderfully soft and moist for days. This means you can bake a batch and enjoy them without worrying about them drying out too quickly.
Crafting the Perfect Chocolate Cupcake Base
The foundation of any great cupcake is, of course, the cake itself. For these homemade Hostess-style treats, we’re keeping it simple and efficient without sacrificing flavor. We utilize a good quality box of chocolate cake mix for the base. Don’t let anyone tell you that using a cake mix isn’t “real” baking – it’s a fantastic shortcut that guarantees consistent results and allows you to focus your energy on the show-stopping filling and topping. The goal here is rich, deeply chocolaty, and incredibly moist cupcakes.
Follow the instructions on your chosen chocolate cake mix for preparing cupcakes. Typically, this involves combining the mix with eggs, oil, and water, then mixing until just combined. Be careful not to overmix, as this can lead to tough cupcakes. Fill your cupcake liners about two-thirds full and bake according to the package directions, or until a toothpick inserted into the center comes out clean. Once baked, remove them from the oven and let them cool completely on a wire rack. This cooling step is crucial before adding the filling and topping; attempting to fill or frost warm cupcakes will result in a melty mess!
The Signature Creamy Filling: A Sweet Surprise
The creamy white filling is arguably what makes Hostess cupcakes so distinctive and beloved. Our copycat version is rich, smooth, and perfectly sweet, providing a delightful contrast to the dark chocolate cake. Achieving the right consistency for this filling is key – you want it stable enough to hold its shape inside the cupcake, yet soft and luscious when you bite into it.
Once your chocolate cupcakes are completely cool, it’s time for the fun part: filling them! There are a couple of methods you can use. The most precise way is with an injector pen, like the one found with a Norpro Cream Canoe Pan (which is also great for making cream-filled pastries). This tool allows you to easily inject the filling directly into the center of each cupcake without much fuss, creating that perfect surprise center. If you don’t have an injector, don’t worry! You can also carefully scoop out a small cone-shaped chunk from the center of each cupcake using a small spoon or a cupcake corer, fill the cavity with the creamy mixture, and then replace the removed cake piece on top, or simply leave it uncovered if you prefer a more rustic look under the chocolate shell.
Creamy Filling Ingredients:
- ½ cup Unsalted Butter, at room temperature
- 1 (8 ounce) package Cream Cheese, at room temperature (purchase cream cheese)
- 5 cups Confectioners’ Sugar, sifted (purchase powdered sugar)
- 1 (8 ounce) container frozen Whipped Topping, thawed (like Cool Whip)
- 1 teaspoon Vanilla Extract (purchase vanilla extract)
To prepare this dreamy filling, combine the room-temperature butter, cream cheese, and sifted confectioners’ sugar in a large mixing bowl. Start on low speed and gradually increase to medium, beating until the mixture is light, fluffy, and completely smooth. Scrape down the sides of the bowl as needed to ensure everything is well incorporated. Finally, gently fold in the thawed whipped topping and vanilla extract until just combined. The whipped topping gives the filling its signature lightness and cloud-like texture. Be careful not to overmix after adding the whipped topping.
The Glossy Chocolate Topping and Iconic Swirls
Once your cupcakes are filled, it’s time for the crowning glory: the glossy chocolate topping. This isn’t just any chocolate frosting; it’s a specific type of ganache that hardens into a beautiful, slightly firm shell, just like the original Hostess cupcakes. This shell not only looks appealing but also helps seal in the moisture of the cake, contributing to their long-lasting freshness.
After coating your cupcakes with this delicious chocolate topping, placing them in the fridge overnight is highly recommended. This chill time allows the chocolate to fully harden and set into that perfect, shiny shell. The next morning, you’ll be amazed at how fantastic they look! For the iconic white swirls, you’ll use some of the same creamy filling. Transfer a portion of the filling into an icing bag fitted with a small round icing tip. With a steady hand, pipe the classic wavy line across the top of each chocolate-coated cupcake. This final touch truly completes the classic Hostess look.
Rich Chocolate Topping Ingredients:
- 6 tablespoons Unsalted Butter, softened
- 1 ½ cups semi-sweet Chocolate Chips (purchase chocolate chips)
- 2 tablespoons Light Corn Syrup (purchase corn syrup)
- ½ teaspoon Vanilla Extract (purchase vanilla extract)
To make the chocolate topping, combine the softened unsalted butter, semi-sweet chocolate chips, and light corn syrup in a medium, microwave-safe bowl. Heat this mixture in the microwave at 30-second intervals, stirring thoroughly between each interval, until the chocolate is completely melted and the mixture appears smooth and glossy. The corn syrup helps achieve that beautiful sheen and smooth texture. Once melted, stir in the vanilla extract. Cover the bowl and chill the frosting in the refrigerator for about 20-30 minutes, or until it has thickened slightly but is still spreadable. Be careful not to leave it in the fridge for too long, as it will harden completely. If it does become too firm, you can easily remelt it by placing it back in the microwave for brief 15-20 second intervals, stirring well each time, until it reaches the desired consistency again.
Tips for Success & Storage
Making these copycat Hostess chocolate cupcakes is a delightful baking project, and with a few extra tips, you can ensure your results are always perfect:
- Room Temperature Ingredients: For both the filling and the topping, using room temperature butter and cream cheese is crucial. This ensures a smooth, lump-free mixture that emulsifies properly.
- Sift Your Sugar: Sifting the confectioners’ sugar for the filling prevents lumps and ensures a silky-smooth consistency.
- Don’t Overfill Cupcakes: Filling cupcake liners about two-thirds full prevents them from overflowing and creates a nice flat top, ideal for decorating.
- Cool Completely: As mentioned, patience is key! Ensure your cupcakes are entirely cool before filling and coating.
- Practice the Swirl: If you’re new to piping, practice the iconic Hostess swirl on a piece of parchment paper first. It’s a simple back-and-forth motion that gets easier with practice.
- Storage: Store your finished copycat Hostess chocolate cupcakes in an airtight container in the refrigerator. They will stay fresh and delicious for 3-5 days. Let them sit at room temperature for about 15-20 minutes before serving for the best texture.
These homemade treats are perfect for parties, bake sales, or simply as a nostalgic indulgence for your family. They bring a touch of classic American charm to any occasion and are always a crowd-pleaser.
Explore More Delicious Recipes
If you loved making these classic chocolate cupcakes, you’re in for a treat! We have a wide variety of recipes on our blog that caters to all tastes and skill levels. Whether you’re a seasoned baker or just starting out, you’ll find something new and exciting to try.
Check out all the recipes we’ve shared here: Tammilee Tips Recipes.
For more chocolatey goodness and easy baking solutions, don’t miss our extensive collection of Chocolate Cake Mix Recipes. These are perfect for whipping up impressive desserts with minimal effort.
Do you enjoy recreating your favorite restaurant or store-bought items at home? Dive into our amazing collection of Copycat Recipes. For those with a sweet tooth, our Dessert Recipes page is packed with irresistible treats. And for convenient, set-it-and-forget-it meals, explore our fantastic Crock Pot Recipes.
Stay connected and never miss a delicious update! Follow Tammilee Tips on Facebook, Instagram, and Pinterest for all our latest recipe posts, baking tips, and culinary adventures. Happy baking!

Copycat Hostess Chocolate Cupcakes
★
★
★
★
🖨️Print
⭐Rate
10
35
45
12
547
kcal
Tammilee Tips
Ingredients
Chocolate Cupcake Ingredients
- 1 Chocolate Cake Mix
Filling Ingredients:
- ½ cup Butter room temperature
- 8 Ounce Cream Cheese room temperature
- 5 cups Confectioners Powdered Sugar sifted
- 8 Ounce Cool Whip thawed
- 1 teaspoon Vanilla Extract
Chocolate Topping Ingredients:
- 6 tablespoons Unsalted Butter softened
- 1 ½ cups semi-sweet chocolate chips
- 2 tablespoons Light Corn Syrup
- ½ teaspoon Vanilla Extract
Instructions
Cupcakes
- Prepare chocolate cupcakes according to package directions. Allow to cool completely.
Filling
- Combine the room-temperature butter, cream cheese, and confectioners’ sugar in a bowl.
- Beat until smooth and fluffy. Gently stir in the thawed whipped topping and vanilla extract until just combined.
- Once cupcakes are cool, fill them using an injector pen or by coring out the center and spooning in the filling.
Chocolate Topping
- In a medium, microwave-safe bowl combine softened butter, semi-sweet chocolate chips, and corn syrup. Heat at 30-second intervals, stirring well between each, until completely melted and glossy.
- Stir in the vanilla extract.
- Cover the bowl and chill the topping for 20-30 minutes until thickened slightly and easily spreadable. If it hardens too much, gently remelt in the microwave for 15-20 second intervals, stirring well.
- Spoon the chocolate topping over each filled cupcake, ensuring an even coating. Place the coated cupcakes in the fridge overnight for the topping to set into a shell.
- Once the chocolate shell is set, pipe the remaining white filling in an iconic wavy swirl pattern on top of each cupcake using a piping bag fitted with a small round tip.
Kitchen Tools
- Muffin Pan
- Cupcake Liners
- Mixing Bowls
- Electric Mixer
- Wire Cooling Rack
- Piping Bag and Round Tip (or injector pen)
Nutrition
Calories from Fat 261
45%
113%
20%
6%
5%
23%
8%
71%
6%
14%
6%
11%
Love this recipe?
Follow @TammileeTIps on Pinterest
Tried this recipe?
Mention @TammileeTipsLife when you share a photo!
