Shark Week Inspired Shark Cupcakes: Dive into a Delicious Ocean Adventure!
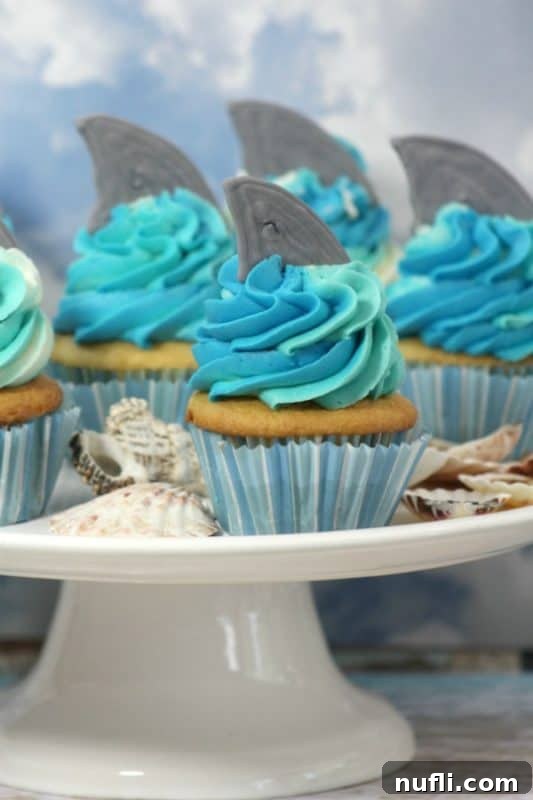
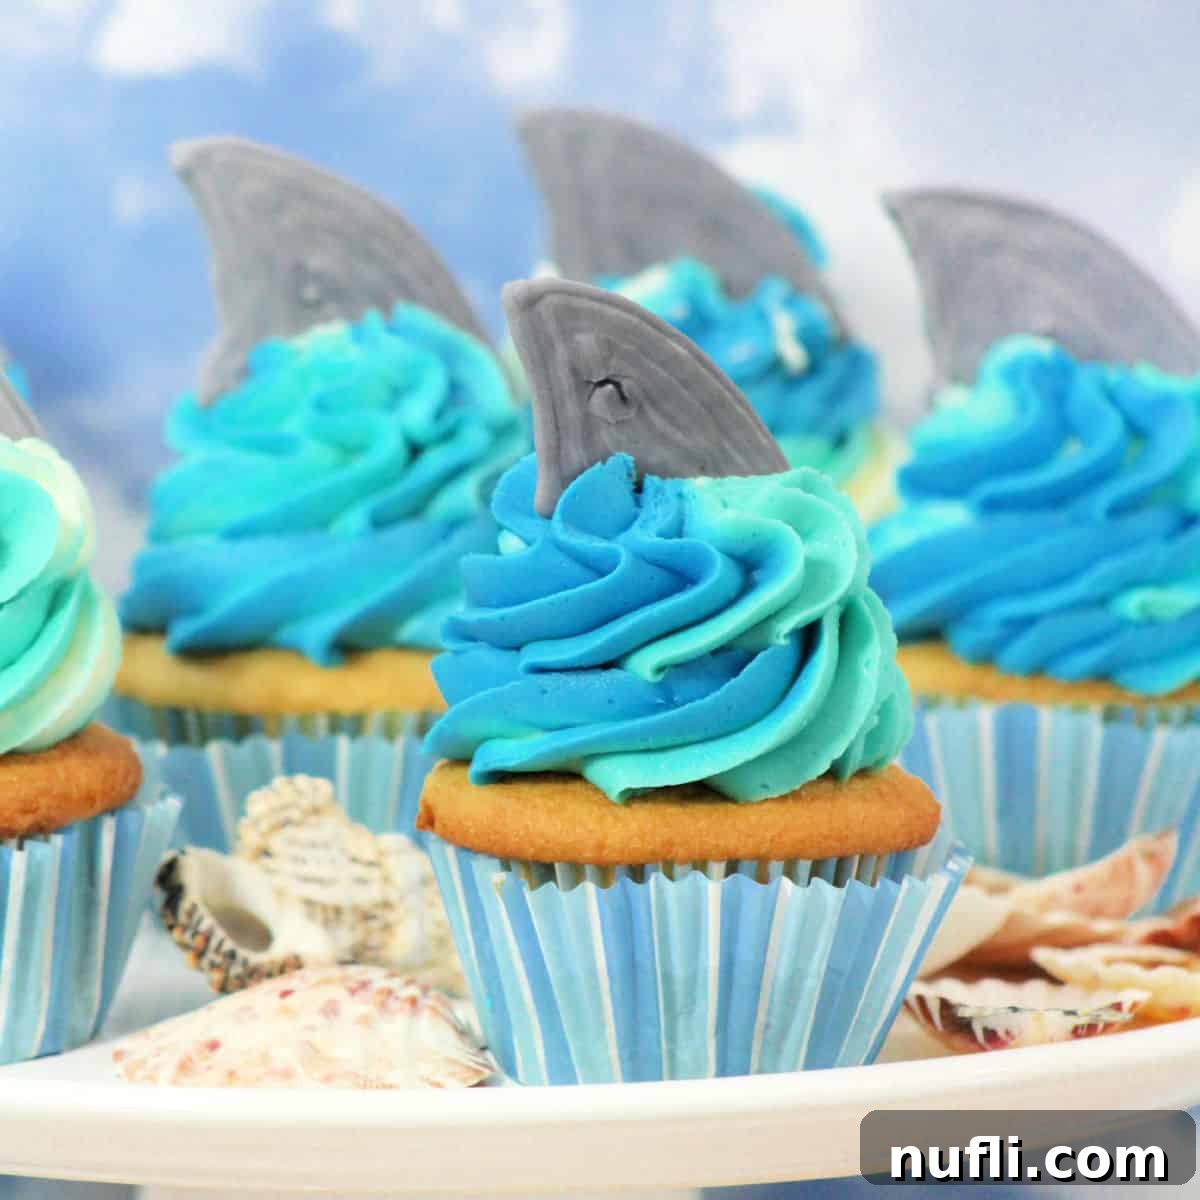
Get ready to make a splash in the kitchen this month as we celebrate all things sea creature with our special “Cupcake Saturday” series! And what better way to kick things off than with these jaw-some Shark Week inspired Shark Cupcakes? With Shark Week making its annual return to television screens this weekend, there’s no better reason to whip up a batch of these fin-tastic treats and join in on the underwater excitement.
Do you find yourself glued to the TV during Shark Week, marveling at the majestic predators of the deep? We certainly do! It’s an annual tradition in our household to catch as much of the captivating programming as possible. Our fascination with sharks even led us on an incredible snorkeling adventure in Grand Turk last year, where we had the amazing opportunity to swim alongside these magnificent creatures in their natural habitat. That experience was truly unforgettable and has only fueled my desire for an even more thrilling encounter: a shark cage diving adventure! While the thought of being surrounded by these powerful animals in a cage sends a little shiver down my spine, the sheer excitement and wonder of it all is incredibly compelling. Can you imagine the thrill of a massive shark swimming just inches away? It’s enough to make you say “EEK!” but also “YES!”

Unleash Your Inner Baker: Crafting the Perfect Shark Cupcakes
These shark-themed cupcakes are more than just a treat; they’re an experience! They bring the thrill of the ocean right to your dessert table, making them perfect for Shark Week parties, children’s birthdays, or any gathering that calls for a touch of aquatic fun. The combination of a moist, fluffy cupcake base, a dreamy ocean-blue frosting, and impressive royal icing shark fins will surely make a splash and be the talk of your event. Follow our detailed guide to create these unique sea creature cupcakes.
Essential Ingredients for Your Shark Cupcake Base
A truly great cupcake begins with high-quality ingredients and a balanced recipe. Here’s what you’ll need to create the perfect foundation for your underwater masterpieces, ensuring a tender crumb and delicious flavor:
- ½ C unsalted butter, softened to room temperature
- 2 large egg whites
- 2 large whole eggs
- 2 C all-purpose flour
- 1 teaspoon baking powder
- ½ teaspoon salt
- ¼ teaspoon baking soda
- ¾ C buttermilk (If you don’t have buttermilk, you can make your own by adding 1 tablespoon of white vinegar or lemon juice to a liquid measuring cup, then filling the rest with regular milk until you reach ¾ C. Let it sit for 5-10 minutes until it slightly curdles.)
- 1 ½ C granulated sugar
- 1 teaspoon vanilla extract (Pure vanilla extract will provide the best flavor.)
Step-by-Step Cupcake Baking Instructions
Creating these delightful homemade cupcakes is a rewarding process. Follow these detailed steps carefully for perfectly baked, moist, and fluffy results every time:
- Preheat Oven and Prepare Pans: Begin by preheating your oven to 350 degrees Fahrenheit (175°C). Line a standard 12-cup cupcake tin with paper liners. This prepares your workstation and ensures even baking.
- Combine Dry Ingredients: In a medium bowl, thoroughly sift together the all-purpose flour, baking powder, salt, and baking soda. Sifting is crucial as it helps aerate the flour, prevents lumps, and ensures that the leavening agents are evenly distributed throughout the batter, contributing to a lighter, more consistent cupcake texture.
- Cream Butter: In a separate large mixing bowl, beat the softened unsalted butter on high speed for approximately 30 seconds using an electric mixer. The butter should become light and creamy.
- Add Sugar and Vanilla: Gradually add the granulated sugar to the creamed butter, followed by the vanilla extract. Continue beating on medium-high speed until the mixture is light, fluffy, and visibly well combined. This process incorporates air into the butter and sugar, which is vital for the cupcake’s structure and texture.
- Incorporate Eggs: Add the egg whites first, beating well until fully incorporated. Then, add the whole eggs one at a time, ensuring each egg is thoroughly mixed into the batter before adding the next. Scrape down the sides of the bowl as needed to ensure everything is evenly combined.
- Alternate Wet and Dry Ingredients: Now, you’ll alternate adding the sifted flour mixture and the buttermilk to the butter-egg mixture. Begin and end with the flour mixture. Beat on low speed until just combined after each addition. A good method is to add ⅓ of the flour mixture, mix briefly, then add ⅓ of the buttermilk, mix. Repeat for the second ⅓ of flour and buttermilk, then finish with the last ⅓ of flour and the remaining buttermilk. Mix only until the ingredients are just combined; be careful not to overmix, as overmixing can develop the gluten in the flour too much, resulting in tough, dense cupcakes.
- Fill Cupcake Liners: Using an ice cream scoop or spoon, fill each prepared cupcake liner about two-thirds full with the batter. This allows room for the cupcakes to rise without overflowing.
- Bake: Bake in the preheated oven for 20-25 minutes. The cupcakes are done when a toothpick inserted into the center of a cupcake comes out clean, indicating they are fully cooked through.
- Cooling Process: Allow the baked cupcakes to cool in the cupcake tin for 10 minutes. This helps them set and makes them easier to handle. After 10 minutes, carefully remove the cupcakes from the tin and transfer them to a wire rack to cool completely. Ensure they are fully cooled before you begin frosting, as warm cupcakes will melt the frosting.

Crafting the Ocean-Inspired Buttercream Frosting
No shark cupcake is truly complete without a luscious, ocean-blue frosting that captures the essence of the deep sea! This buttercream recipe yields a smooth, creamy, and stable frosting that holds its shape beautifully, making it perfect for creating impressive swirls and holding your edible shark fins.
Frosting Ingredients:
- 1 C soft unsalted butter (Ensure it’s truly softened, not melted, for the best consistency.)
- 4+ C powdered sugar (also known as confectioners’ sugar or icing sugar, you may need more or less depending on desired consistency)
- 4 tablespoon heavy whipping cream
- Blue gel food coloring (Gel coloring provides vibrant color without thinning the frosting.)
Frosting Directions:
- Cream Butter and Sugar: In a large mixing bowl, using an electric mixer, cream together the softened unsalted butter and 4 cups of powdered sugar. Start on low speed to prevent a sugar cloud, then increase to medium-high speed. Beat until the mixture becomes light, fluffy, and creamy, which may take several minutes.
- Adjust Consistency (if needed): If the frosting appears too dry or crumbly and doesn’t reach a creamy consistency, add a few drops of heavy whipping cream and continue to beat. This helps achieve the desired smooth texture and stiffness.
- Test for Stiff Peaks: Test the frosting to see if it can form and hold a stiff peak. Dip a spoon or spatula into the frosting and lift it; if the peak holds its shape without collapsing, it’s ready. If it’s too soft, gradually add more powdered sugar, ½ cup at a time, beating after each addition until the desired stiff peak consistency is achieved. If it becomes too stiff, add a tiny bit more heavy cream, one teaspoon at a time.
- Divide and Color Frosting: Once your perfect white buttercream is ready, divide it into two equal halves in separate bowls. Leave the first bowl of frosting white. To the second bowl, add several drops of blue gel food coloring. Stir thoroughly with a spatula or spoon until you achieve a consistent, vibrant blue color reminiscent of the ocean. You can adjust the amount of blue coloring to your preferred shade.
- Prepare Pastry Bag for Two-Tone Effect: Prepare a large pastry bag fitted with your chosen frosting tip (a large round tip, like Wilton 1A, or a large star tip, like Wilton 1M, works wonderfully for cupcakes). Carefully scoop the white frosting into one side of the pastry bag. Then, scoop the blue frosting into the other side of the same pastry bag. Gently twist the open end of the pastry bag to push both colors of frosting evenly towards the tip.
- Test Frosting (Optional but Recommended): Before frosting your cooled cupcakes, you may want to test the two-tone effect on a plate. This ensures both white and blue frostings come out simultaneously, creating a beautiful and dynamic swirl that truly mimics ocean waves.
- Frost Cupcakes: To frost the cupcakes, hold the pastry bag perpendicular to the cupcake. Start piping at the outer edge of a cooled cupcake in a circular motion, working your way inwards and upwards until you reach the center. This creates an attractive swirl pattern.
Designing Realistic Royal Icing Shark Tails
The royal icing shark tails are the signature detail that truly brings these cupcakes to life, transforming them into miniature ocean scenes. While they require a bit of patience and steady hands, the striking and personalized result is well worth the effort!
Royal Icing Ingredients:
- 2 large egg whites (ensure they are at room temperature)
- 1 C powdered sugar (confectioners’ sugar), sifted
- ½ teaspoon cream of tartar (This helps stabilize the egg whites and makes the icing whiter and stronger.)
- Grey or silver gel food coloring (Gel coloring is preferred for royal icing as it adds color without adding excess liquid.)
Royal Icing Directions:
- Combine and Beat Icing Ingredients: In a clean, dry mixing bowl (preferably metal or glass, as plastic can retain grease), combine the egg whites, sifted powdered sugar, and cream of tartar. Using an electric mixer, beat on medium speed for approximately 4 minutes, or until the icing is very stiff and holds firm peaks. The mixture should be thick enough that when you lift the beaters, the icing forms a peak that stands upright. (Do not add the food coloring yet).
- Adjust Icing Consistency: If the icing is not stiff enough after 4 minutes, gradually add an additional ¼ cup of sifted powdered sugar, one tablespoon at a time, and continue beating until it reaches the desired stiff, pipeable consistency. It should be thick enough to hold its shape for detailing.
- Color the Icing: Spoon the white royal icing into a large, clean bowl. Add several drops of grey or silver gel food coloring to the icing. Stir well with a spatula to thoroughly mix the color, ensuring a uniform, shark-like hue. You can adjust the amount of coloring to achieve your desired shade of grey.
Crafting the Shark Tails:
This is where your creativity comes into play! Take your time with each tail for the best results.
- Prepare Your Template: Begin by searching for a clear, simple image of a shark’s tail online (Google Images is an excellent resource for this!). Print the picture in color, ensuring you have multiple small images of the tail on one sheet, sized appropriately for your cupcakes. Aim for tails that are about 1.5 to 2 inches tall.
- Set Up Your Workspace: Tape this printed sheet securely onto a sturdy cookie sheet or any flat, firm surface. This prevents it from shifting while you work.
- Apply Wax Paper: Cover the printed images with a piece of wax paper, taping the wax paper securely over the sheet. The wax paper will serve as your non-stick surface, allowing the royal icing tails to peel off easily once dry.
- Prepare for Piping: Transfer the grey royal icing into a small pastry bag fitted with a #2 decorating tip. This fine tip is perfect for the intricate details and delicate outlines required for the shark tails.
- Pipe the Shark Tails: Carefully outline each shark tail image on the wax paper using the grey royal icing. Once the outline is complete, meticulously fill in the entire image with royal icing. Work quickly and smoothly to achieve a clean, consistent surface. Be as precise as possible to capture the unique shape and features of the shark tail.
- Allow to Dry Completely: This is a crucial step! Allow the royal icing shark tails to dry completely for a minimum of 5-10 hours, or even overnight, depending on the humidity levels in your environment. They must be completely hard and brittle before you attempt to handle them.
- Test for Dryness: To test if they are fully dry, gently touch one with your finger in an inconspicuous spot. If it still feels soft or allows you to push into the icing, let it dry longer. A fully dry royal icing tail will feel hard and rigid, not allowing any indentations. Patience here is key to prevent breakage.
- Prepare for Placement: Once completely dry, carefully cut the wax paper into small squares surrounding each completed shark tail design. This makes them much easier to handle without damaging the delicate icing.
- Final Placement: Gently peel the dry royal icing shark tails off the wax paper. They should come off cleanly with minimal effort. Carefully insert one finished shark tail upright into the center of each frosted cupcake. This creates a striking and playful shark fin effect that will impress your guests and bring your ocean-themed treats to life!
Essential Baking Safety Tip: Heat Resistant Potholders
Safety in the kitchen is paramount, especially when you’re busy baking up a storm. We learned a valuable and rather frightening lesson a couple of years ago that we now share to help others stay safe. We had a fire scare when we didn’t realize we had accidentally turned a burner on, and a nearby cloth potholder caught fire. Thankfully, we walked by the kitchen just in time, noticed the smoke, and were able to get it out ourselves before any serious damage occurred. It was a stark reminder of how quickly accidents can happen.
Since that incident, we have exclusively used heat-resistant silicone potholders. They offer superior protection and peace of mind compared to traditional fabric options. We highly recommend investing in good quality, heat-resistant kitchen tools to prevent similar accidents and ensure a safe and enjoyable baking environment for everyone.
More Delicious Recipes to Explore
If you’ve enjoyed making these delightful shark cupcakes, you’re in for a treat! Our site is packed with a variety of mouth-watering recipes perfect for every craving, occasion, and skill level. Dive into our extensive culinary collections and discover your next favorite dish:
- Copycat Creations: Explore our creative copycat recipes to recreate your restaurant favorites and beloved fast-food items right in your own kitchen. Save money and impress your friends and family!
- Irresistible Desserts: Indulge your sweet tooth with our extensive selection of dessert recipes. From decadent cakes to light and fruity treats, there’s something to satisfy every craving.
- Effortless Slow Cooker Meals: Discover easy, convenient, and flavorful meal ideas with our fantastic Crock-Pot Recipes. Perfect for busy weeknights or when you want a delicious meal with minimal effort.
Stay Connected for More Culinary Inspiration
Don’t miss out on our latest recipes, baking tips, travel adventures, and lifestyle insights! Follow Tammilee Tips across your favorite social media platforms to stay updated, get inspired, and join our vibrant community of food lovers:
- Connect with us on Facebook for daily updates and fun interactions.
- Follow us on Instagram for beautiful food photography and behind-the-scenes glimpses.
- Find endless inspiration on Pinterest with our curated recipe boards and creative ideas.
- Keep an eye out for our content on MSN for even more tips and tricks (link not provided, but we are present there).
We absolutely love seeing your culinary creations! If you try this incredible Shark Week inspired Shark Cupcakes recipe, be sure to share your photos on social media and tag us. Your baking adventures inspire us, and we can’t wait to see your fin-tastic results! Happy baking and enjoy your delicious ocean adventure!
